Best Ever Creamy Lemon Cheesecake Crumb Bars Everyone Will Enjoy!
There are some days when you just need a little sunshine, even if it’s pouring rain outside. For me, that feeling often arrives with the irresistible aroma of something baking in the oven. I vividly remember a particularly gloomy Sunday afternoon, the kind where the clouds hug the windows and all you want is comfort. That day, I decided to tackle a recipe I’d been dreaming about – these incredible Creamy Lemon Cheesecake Crumb Bars Everyone Will Enjoy. The first bite was pure magic: a burst of bright lemon, a silky-smooth cheesecake, and that satisfyingly buttery, crumbly crust. It transformed the whole afternoon!
These bars have since become a beloved family favorite and a true star at every potluck and gathering. They’re that perfect balance of tangy and sweet, rich yet refreshing, making them an ideal easy dessert for any occasion. Forget complicated techniques or a water bath; this tested and perfected recipe is incredibly foolproof, delivering show-stopping results with minimal effort. They truly embody everything you want in a simple yet elegant make-ahead treat.
Whether you’re looking for a delightful treat to brighten your day, a stunning dessert to impress guests, or just a little something sweet to enjoy with your afternoon coffee, these lemon cheesecake bars are your answer. Get ready to fall in love with their vibrant flavor and delightful texture – they are truly an unparalleled dessert experience!
Why You’ll Love This Recipe
❤️ Here’s why these Creamy Lemon Cheesecake Crumb Bars will quickly become a cherished recipe in your kitchen:
- Absolutely Irresistible Flavor: The combination of bright, zesty lemon and rich, creamy cheesecake is simply divine. It’s a perfect balance that’s neither too tart nor too sweet, making every bite a refreshing delight. The vibrant citrus notes cut through the richness beautifully, creating a harmonious and utterly delicious experience that will have everyone asking for more.
- Amazingly Simple to Make: Forget the fuss of traditional cheesecakes! This recipe is designed for ease, eliminating complicated steps like a water bath. With straightforward instructions and common pantry ingredients, you’ll find the baking process incredibly enjoyable and stress-free, perfect for even novice bakers.
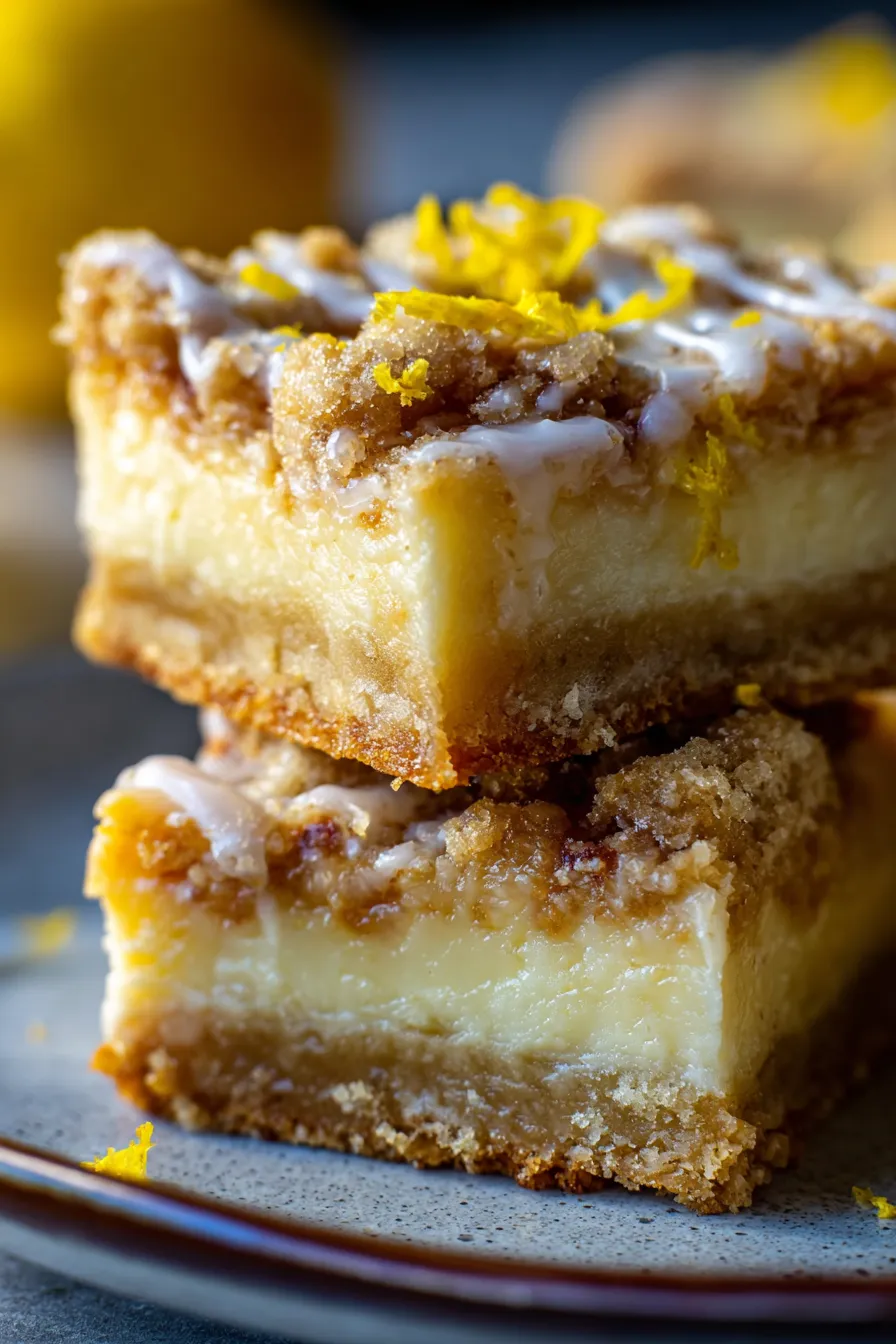
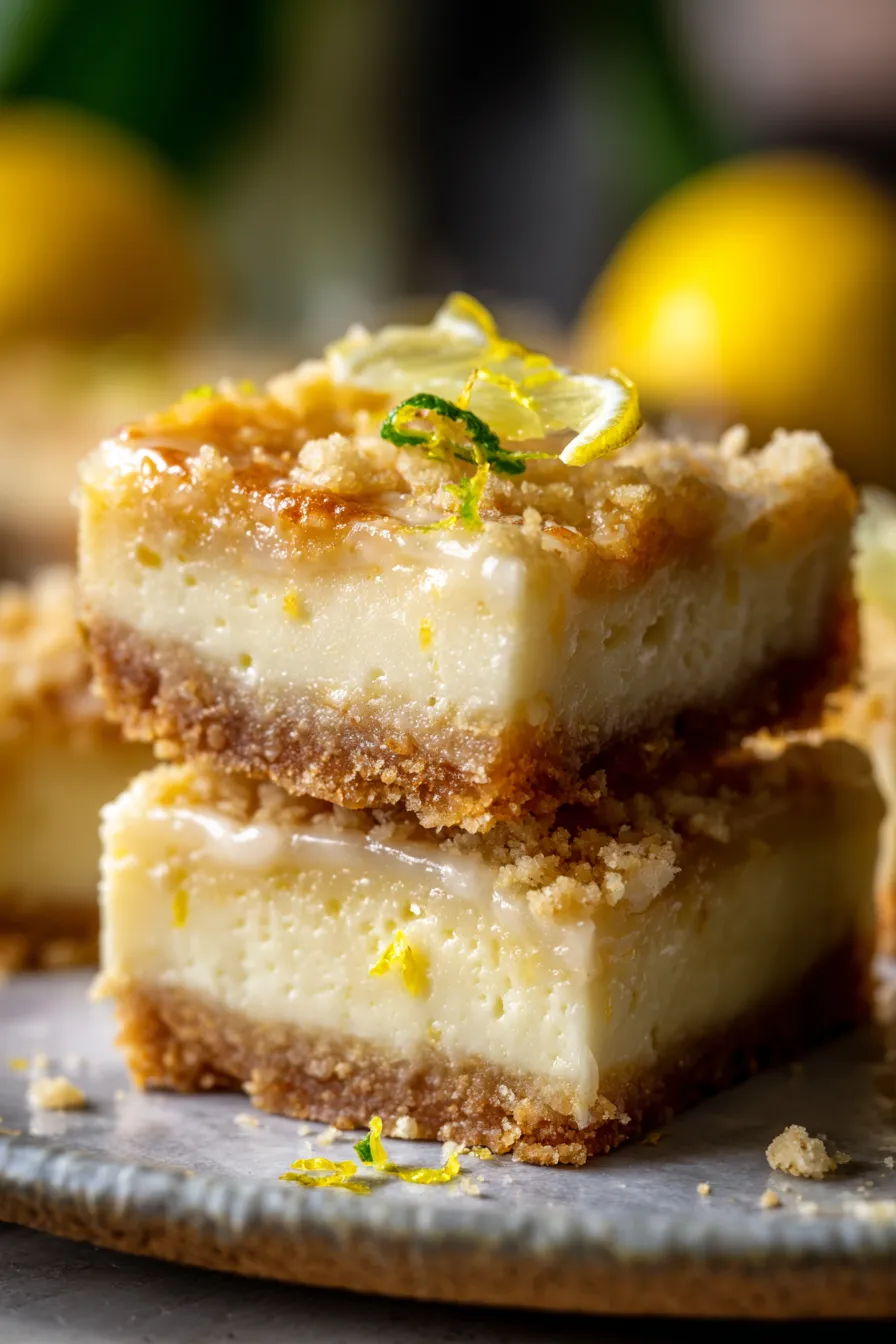
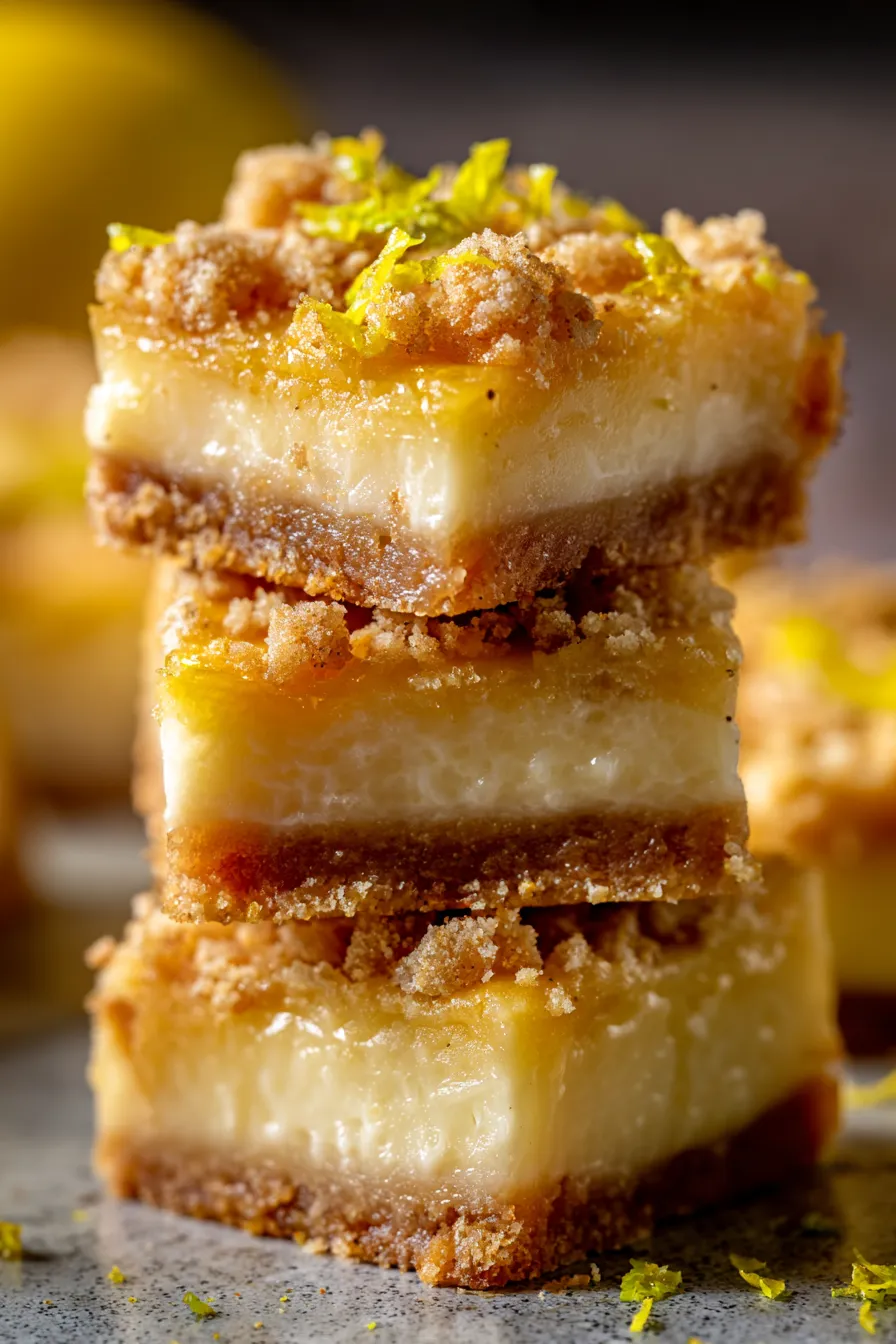
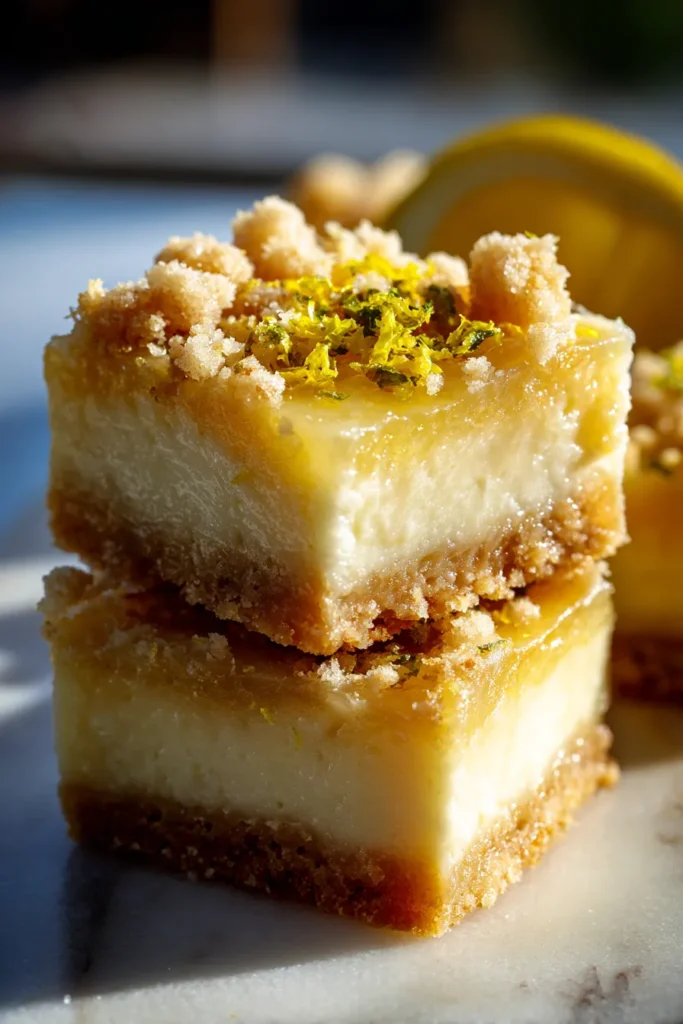
- Perfect Texture Contrast: Enjoy the best of both worlds with a buttery, golden shortbread-style crust and a soft, crumbly topping that perfectly complements the silky-smooth, luscious cheesecake filling. This delightful interplay of textures creates an exciting mouthfeel that keeps you coming back for another piece.
- A True Crowd-Pleaser: These bars disappear fast at parties, potlucks, and family gatherings! Their universally appealing flavor and attractive presentation make them a guaranteed hit with guests of all ages. You’ll receive countless compliments every time you serve them.
- Fantastic for Make-Ahead: Planning a party or just want to have a treat ready? These bars are ideal for making in advance. They firm up beautifully in the refrigerator, and the flavors actually deepen overnight, making them an excellent choice for meal prepping your desserts or preparing for special occasions without last-minute stress.
- No-Fuss Slicing and Serving: Unlike whole cheesecakes, these bars are a breeze to slice and serve. Their sturdy structure makes them perfect for portioning, and they hold their shape beautifully, ensuring elegant presentation every time. No more crumbling slices or messy plates!
- Versatile & Customizable: While perfect as is, these bars also offer endless possibilities for customization. You can easily adapt them with different citrus, add berries, or experiment with various extracts to create your own signature twist, making this recipe a fantastic foundation for culinary creativity.
What You Need
You only need a few simple pantry staples for this incredibly delicious recipe! Most of these ingredients are likely already in your kitchen, making it super convenient to whip up a batch whenever a craving strikes. Check the full printable recipe card below for detailed measurements and a complete list.
💡 Expert Tips for Perfect Lemon Cheesecake Crumb Bars
- Room Temperature Ingredients are Key: For the smoothest, creamiest cheesecake filling, ensure your cream cheese and eggs are at room temperature. Cold ingredients can lead to a lumpy batter and may not emulsify properly, affecting the final texture and preventing that desired velvety consistency. Take them out of the fridge at least 30-60 minutes before you start baking.
- Don’t Overmix the Cheesecake Filling: Once you’ve added the eggs, mix just until combined. Overmixing incorporates too much air, which can cause the cheesecake to puff up in the oven and then crack or sink as it cools. Gentle mixing is the secret to a perfectly smooth and dense cheesecake layer.
- Zest Like a Pro: When zesting your lemons, be careful to only grate the bright yellow outer layer, avoiding the bitter white pith underneath. The zest contains all the aromatic oils and intense lemon flavor, so using fresh, good-quality lemons will make a significant difference to the overall taste of your bars.
- Press the Crust Firmly: For a sturdy and cohesive base, press the crumb mixture firmly and evenly into the bottom of your prepared baking pan. This ensures the crust holds together well when sliced and prevents it from crumbling too much. You can use the bottom of a glass or your knuckles to get an even layer.
- Don’t Overbake: Cheesecake bars are notoriously easy to overbake. Look for edges that are set and a center that has just a slight jiggle when gently nudged. Overbaked cheesecake will be dry and rubbery, losing its signature creamy texture. Keep a close eye on them during the last few minutes of baking.
- Cool Completely and Chill Thoroughly: Patience is crucial for perfect bars! Allow the bars to cool completely at room temperature on a wire rack before transferring them to the refrigerator to chill for at least 3-4 hours, or preferably overnight. This chilling time allows the cheesecake to fully set and firm up, making for clean, beautiful slices.
- Use a Warm, Clean Knife for Slicing: For the neatest cuts, dip a sharp knife into hot water, wipe it clean, and then slice your chilled bars. Repeat this process after every couple of cuts. This helps the knife glide through the cheesecake and crust without dragging or sticking, creating those beautiful, bakery-worthy edges.
- Adjust Sweetness and Tang: Feel free to adjust the amount of sugar in the cheesecake filling or the lemon juice to suit your personal preference. If you love a really tart lemon flavor, you can add a touch more lemon juice, or if you prefer a sweeter profile, a little extra sugar won’t hurt. Always taste your filling mixture before adding eggs.
- Line Your Pan: Always line your baking pan with parchment paper, leaving an overhang on the sides. This creates ‘slings’ that make it incredibly easy to lift the entire batch of chilled bars out of the pan for clean, effortless slicing, saving you from any potential sticking disasters.
Variations & Substitutions
These Creamy Lemon Cheesecake Crumb Bars are wonderful on their own, but don’t hesitate to get creative! Here are a few ideas to customize them:
- Gluten-Free Option: Easily make these bars gluten-free by swapping the all-purpose flour in the crust and topping with your favorite 1:1 gluten-free baking flour blend. Ensure your blend contains xanthan gum for best results.
- Other Citrus Flavors: Not a lemon fan, or just want to mix things up? Try using fresh lime juice and zest for a Key Lime-inspired bar, or orange zest and a touch of orange juice for a sweeter, more aromatic treat.
- Add-Ins: Fold a handful of fresh or frozen (not thawed) raspberries, blueberries, or chopped white chocolate chips into the cheesecake filling just before pouring it over the crust. They add lovely bursts of flavor and color.
- Flavor Boosts: Enhance the vanilla flavor with vanilla bean paste instead of extract. A tiny hint of almond extract in the crust can also add a delightful complexity, complementing the lemon beautifully.
- Nutty Crust: For extra crunch and flavor, swap out some of the flour in the crumb mixture for finely chopped nuts like almonds, pecans, or walnuts. This adds a lovely dimension to the texture.
- Cream Cheese Swap: While full-fat cream cheese is recommended for the best texture, you can experiment with reduced-fat cream cheese. Just be aware that the filling might be slightly less firm and creamy.
Storage & Freezing
One of the best things about these Creamy Lemon Cheesecake Crumb Bars is how well they store, making them perfect for enjoying over several days or even stashing away for a future craving!
- Refrigerator: Once completely cooled and chilled, store the bars in an airtight container in the refrigerator for up to 5-7 days. It’s best to place parchment paper between layers if stacking to prevent sticking.
- Room Temperature: Due to the cream cheese filling, these bars are best kept refrigerated. They can sit out at room temperature for about 1-2 hours for serving, but beyond that, pop them back in the fridge to maintain their freshness and food safety.
- Freezing: Yes, these bars freeze beautifully! Once chilled and sliced, place the bars in a single layer on a baking sheet and freeze until solid (about 2-3 hours). Then, transfer the frozen bars to an airtight freezer-safe container or a heavy-duty freezer bag, layering them with parchment paper. They will keep well in the freezer for up to 2-3 months.
- Thawing: To enjoy, simply remove the desired number of frozen bars and let them thaw in the refrigerator overnight, or at room temperature for about 1-2 hours.
FAQ
Q: Can I use bottled lemon juice instead of fresh?
A: While you technically can, I highly recommend using fresh lemon juice and zest. The flavor profile of fresh lemons is far superior, providing a brighter, more natural tang that truly elevates the cheesecake bars. Bottled juice can sometimes taste artificial and lack the zest’s aromatic oils.
Q: How do I know when the cheesecake bars are done baking?
A: The edges of the cheesecake layer should appear set and slightly golden, while the very center should still have a slight jiggle when you gently nudge the pan. It will continue to set as it cools. Overbaking can lead to a dry, cracked cheesecake, so it’s better to underbake slightly than overbake.
Q: My crumb topping isn’t crumbly enough, what went wrong?
A: This usually means the butter was too warm or you overmixed the crumb ingredients. For a good crumbly texture, the butter should be cold and cut into small pieces, and you should mix just until coarse crumbs form, not a uniform dough. You can also pinch some of the mixture between your fingers to create larger, more distinct crumbs before sprinkling.
Q: Why did my cheesecake crack?
A: Cracks in cheesecake are often caused by overbaking, overmixing the batter (incorporating too much air), or drastic temperature changes during cooling. To minimize cracking, ensure ingredients are at room temperature, don’t overmix, and allow the bars to cool slowly at room temperature before chilling.
Q: Can I make these Creamy Lemon Cheesecake Crumb Bars ahead of time for a party?
A: Absolutely! These bars are actually even better when made a day in advance. This allows the flavors to meld beautifully and the cheesecake layer to fully set, resulting in perfect slices. Just store them covered in the refrigerator until ready to serve.
Conclusion
And there you have it, folks – your new go-to recipe for the most delightful Creamy Lemon Cheesecake Crumb Bars Everyone Will Enjoy! These bars truly are a celebration of bright flavors and wonderful textures, guaranteed to bring a smile to anyone who tries them. I hope you love baking and sharing them as much as I do. Don’t forget to pin this recipe for later so you can revisit this sunshine-filled treat whenever the craving strikes!
Happy baking!
Best Lemon Cheesecake Crumb Bars: Easy & Creamy Dessert
Ingredients
- For the Crumb Crust & Topping:
- 1 ½ cups (180g) all-purpose flour
- ½ cup (100g) granulated sugar
- ½ teaspoon salt
- ¾ cup (1½ sticks, 170g) unsalted butter, very cold and cubed
- For the Lemon Cheesecake Filling:
- 16 oz (452g) full-fat cream cheese, softened
- ½ cup (100g) granulated sugar
- 2 large eggs, room temperature
- ¼ cup (60ml) fresh lemon juice
- 1 tablespoon lemon zest (from 1-2 lemons)
- 1 teaspoon vanilla extract
- Pinch of salt
Instructions
- Step 1 Preheat your oven to 350°F (175°C). Line a 9x13 inch baking pan with parchment paper, leaving an overhang on the sides for easy removal.
- Step 2 Make the Crumb Crust & Topping: In a medium bowl, whisk together the flour, sugar, and salt. Cut in the cold, cubed butter using a pastry blender, your fingertips, or a food processor until the mixture resembles coarse crumbs with some pea-sized pieces remaining.
- Step 3 Press about two-thirds of the crumb mixture firmly and evenly into the bottom of the prepared pan. Bake for 12-15 minutes, or until lightly golden. Remove from oven and let cool slightly.
- Step 4 Prepare the Lemon Cheesecake Filling: In a large bowl, using an electric mixer, beat the softened cream cheese and granulated sugar on medium speed until smooth and creamy, about 2-3 minutes. Scrape down the sides of the bowl.
- Step 5 Beat in the eggs one at a time, mixing just until combined after each addition. Be careful not to overmix once the eggs are added.
- Step 6 Stir in the fresh lemon juice, lemon zest, vanilla extract, and pinch of salt until fully incorporated.
- Step 7 Assemble & Bake: Pour the cheesecake filling evenly over the partially baked crust. Sprinkle the remaining one-third of the crumb mixture over the cheesecake filling.
- Step 8 Bake for 25-30 minutes, or until the edges are set and the center has a slight jiggle. The crumb topping should be lightly golden brown.
- Step 9 Cool & Chill: Remove the pan from the oven and let it cool completely on a wire rack at room temperature. Once cooled, transfer the pan to the refrigerator and chill for at least 3-4 hours, or preferably overnight, for the best texture and clean slicing.
- Step 10 Slice & Serve: Once thoroughly chilled, use the parchment paper overhang to lift the entire slab of bars out of the pan. Place on a cutting board. For clean slices, dip a sharp knife in hot water and wipe it clean before each cut. Slice into 16-24 bars. Serve chilled and enjoy!