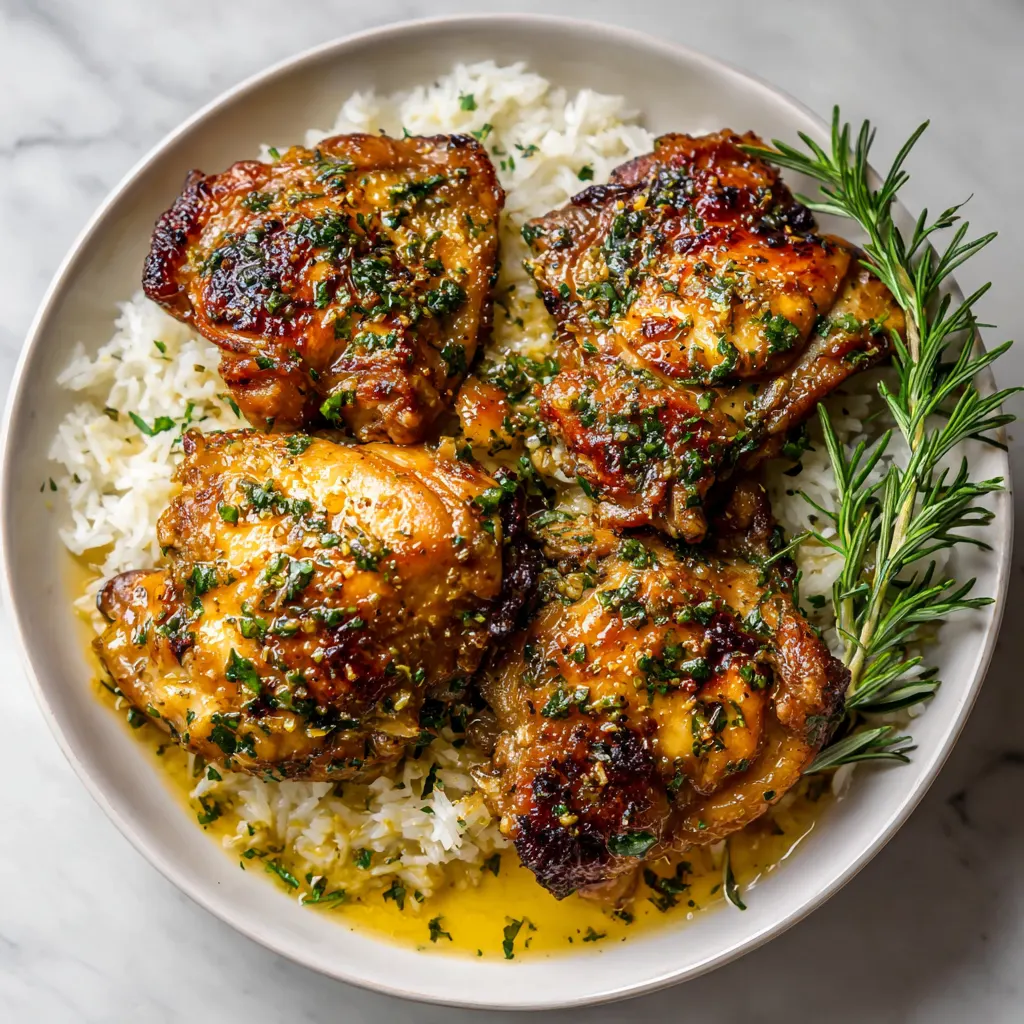
The garlic butter chicken thigh is the undisputed champion of weeknight meals. It combines the rich, savory flavor of pan-seared dark meat with an intensely aromatic sauce, all while being remarkably fast and simple to execute. Unlike lean chicken breast, the thigh’s higher fat content naturally keeps it juicy and tender, making it virtually impossible to dry out. This recipe focuses on creating a beautifully crispy exterior and a luscious, bright pan sauce, delivering a restaurant-quality dish in under 30 minutes using just one skillet.
The Core Recipe: Stovetop Garlic Butter Chicken Thighs
This recipe uses boneless, skinless chicken thighs for the quickest cook time and utilizes a simple deglazing technique to create a rich, emulsified garlic butter sauce directly in the pan.
Ingredients
For the Chicken:
-
4 (about 1.5 lbs) boneless, skinless chicken thighs
-
1 tablespoon olive oil (or other high-heat cooking oil)
-
1 teaspoon Kosher salt
-
½ teaspoon freshly ground black pepper
-
½ teaspoon garlic powder
-
½ teaspoon dried Italian seasoning (or dried thyme/paprika)
For the Garlic Butter Pan Sauce:
-
4 tablespoons (½ stick) unsalted butter, cubed and cold
-
4 cloves fresh garlic, minced
-
¼ cup dry white wine (such as Pinot Grigio or Sauvignon Blanc) or extra chicken broth
-
½ cup low-sodium chicken broth
-
1 tablespoon fresh lemon juice
-
1 tablespoon fresh parsley or thyme, chopped (for garnish)
Step-by-Step Instructions
-
Prepare the Chicken: Pat the chicken thighs completely dry using paper towels. This step is non-negotiable for achieving a deep golden-brown sear. Trim any excess large fat deposits. In a small bowl, combine the salt, pepper, garlic powder, and Italian seasoning. Sprinkle the seasoning mixture generously over both sides of the chicken.
-
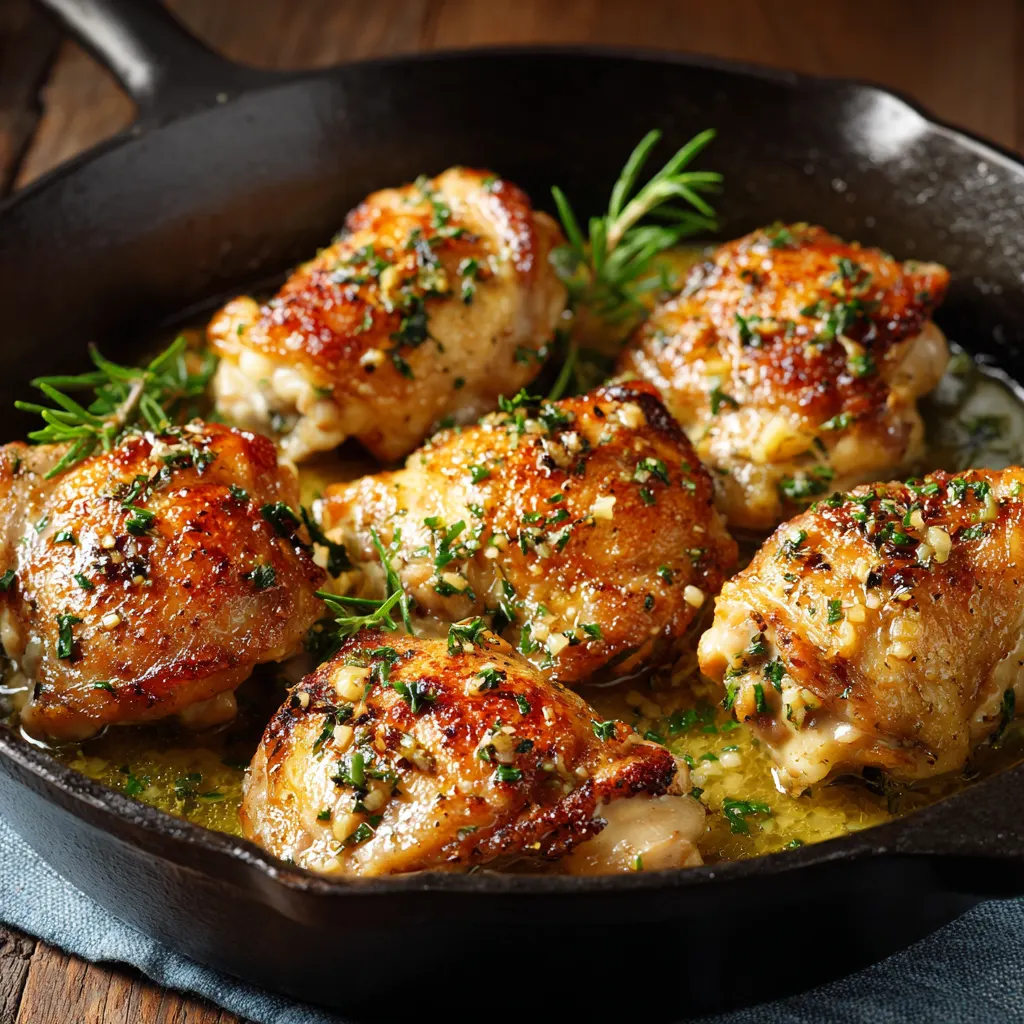
Sear the Chicken: Heat the olive oil in a large (10-inch or 12-inch) cast iron or stainless steel skillet over medium-high heat until the oil is shimmering. Place the chicken thighs in the hot skillet, ensuring they are not overcrowded. Sear undisturbed for 4 to 5 minutes until a rich, golden-brown crust forms. Flip the chicken and sear the second side for another 3 to 4 minutes. The chicken will not be fully cooked yet.
-
Rest and Deglaze: Transfer the seared chicken to a clean plate and loosely cover it with foil. Immediately reduce the heat to medium-low. If the pan has excess oil, drain a small amount, leaving behind the browned bits (fond). Pour the white wine (or extra broth) into the hot pan and use a wooden spoon or spatula to scrape up all the caramelized bits stuck to the bottom. Let the liquid reduce by half, about 1 minute.
-
Build the Sauce: Stir in the chicken broth and lemon juice. Bring the liquid to a gentle simmer. Once simmering, reduce the heat to the lowest setting.
-
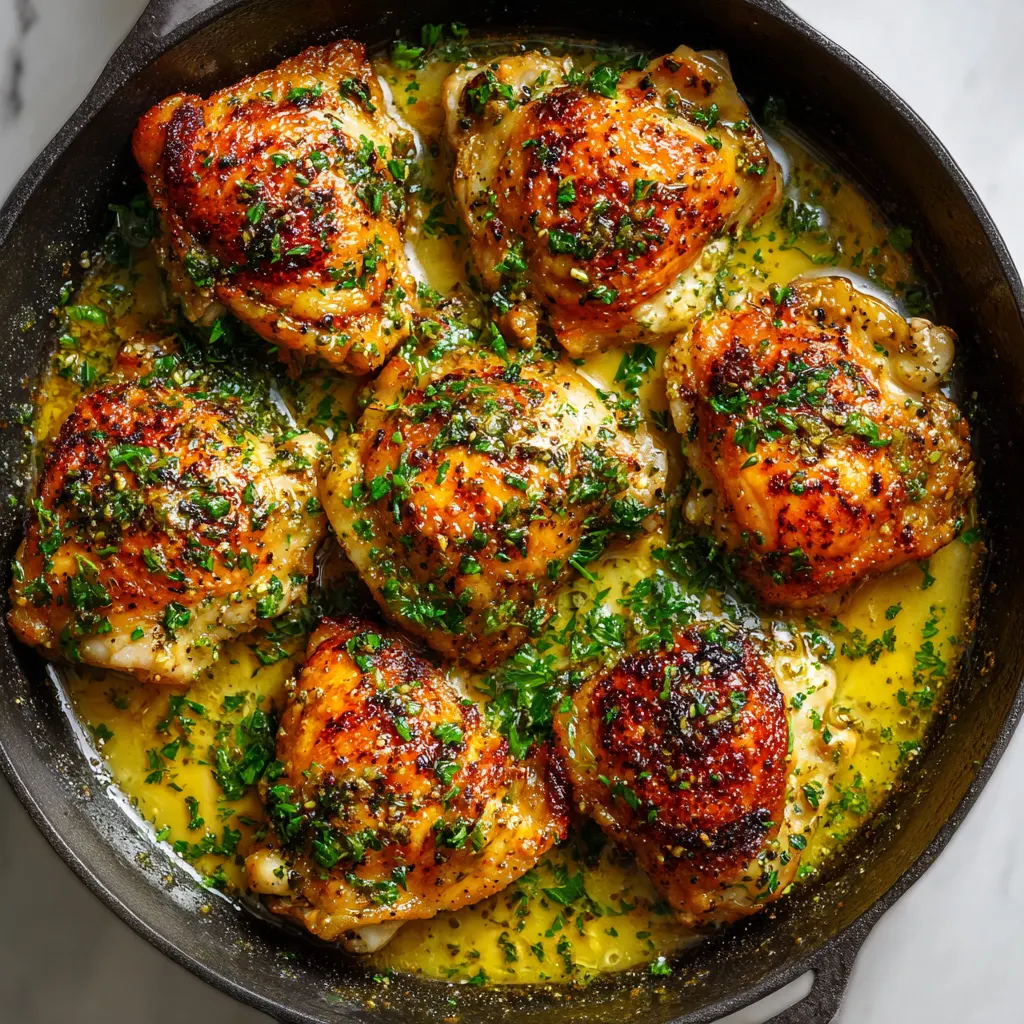
Emulsify the Butter: Add the cold butter cubes into the simmering liquid, one tablespoon at a time, whisking continuously until each piece is fully incorporated and the sauce looks creamy and opaque. This process, called emulsification, thickens the sauce without needing flour or cream.
-
Finish and Serve: Return the seared chicken thighs and any accumulated juices from the plate to the skillet, nestling them into the pan sauce. Simmer gently for 2 to 3 minutes, or until the chicken reaches an internal temperature of 165°F (74°C) when measured with an instant-read thermometer. Spoon the sauce over the chicken repeatedly. Garnish with fresh parsley or thyme and serve immediately.
Mastering the Sear: Secrets to Crispy Skin and Juicy Meat
The success of garlic butter chicken thighs hinges entirely on proper technique, particularly during the initial sear. Whether you choose bone-in, skin-on thighs (for maximum flavor and crispiness) or boneless, skinless cuts (for speed), a perfect sear is what builds the foundation of the dish.
The Role of Preparation
The biggest obstacle to a crispy crust is moisture. Chicken thighs, especially if purchased pre-packaged, often retain surface moisture.
-
Pat Dry Aggressively: Before seasoning, use paper towels to press firmly and absorb all surface moisture from the chicken. This allows the heat to immediately focus on browning the proteins rather than evaporating water.
-
Optimal Temperature: Ensure the chicken is brought close to room temperature before cooking (about 15-20 minutes out of the fridge). This promotes even cooking from edge to center.
-
High-Heat Oil: Use an oil with a high smoke point (like olive oil, canola oil, or avocado oil) for the initial sear. The pan is ready when the oil begins to shimmer slightly.
Searing Technique for Perfection
The key to a deep, flavorful crust is patience and minimal interference.
-
Placement: Place the chicken thighs skin-side down (or the smooth, presentation side down for skinless thighs).
-
Hands-Off Cooking: Do not move the chicken for the first 4 to 5 minutes. Allowing the chicken to cook undisturbed ensures the crust has time to solidify and release easily from the pan when ready. If the chicken sticks, it simply means the sear is not yet complete.
-
Temperature Control: Start on medium-high heat, then slightly reduce the heat if the skin begins to burn before the sear is achieved. The goal is a rich, golden-brown color, which contributes significant flavor compounds (the Maillard reaction) that become the base of the pan sauce.
-
Final Temperature Check: The chicken is considered safe and optimally juicy when its internal temperature reaches 165°F (74°C). Always use an instant-read thermometer inserted into the thickest part of the meat to avoid overcooking.
The Pan Sauce Paradox: Creating a Creamy, Flavorful Finish
The true signature of this dish is the velvety, rich garlic butter sauce that coats the chicken. Achieving this texture without using heavy cream is a sign of great cooking technique, relying on deglazing and emulsification.
The Importance of Deglazing
The browned bits left at the bottom of the pan after searing are called fond, and they are pure flavor gold. Deglazing—adding a cold liquid (like wine or broth) to the hot pan—allows these flavorful remnants to be lifted and incorporated into the sauce base.
-
Acidity is Key: Adding a dry white wine, followed by a splash of lemon juice, adds crucial acidity. This brightens the sauce, balances the richness of the butter, and significantly deepens the overall flavor profile. If omitting alcohol, use additional broth and increase the lemon juice slightly.
-
Preventing Burn: Once the chicken is removed, immediately turn the heat to low-medium before adding fresh garlic. Garlic burns quickly at high temperatures, turning bitter and ruining the flavor of the final sauce. Sauté the garlic for just 30 to 60 seconds until fragrant.
The Emulsification Secret
The difference between a broken, oily sauce and a luscious, creamy one is the temperature of the butter.
-
Use Cold Butter: Cold butter, cut into cubes, is essential. When whisked slowly into the simmering liquid base (broth/wine), the water in the butter (which is an emulsion itself) mixes with the liquids in the pan, creating a stable, smooth, and thickened sauce.
-
Low and Slow: Ensure the heat is very low when adding the butter. Adding warm or melted butter to a high-heat liquid will cause the butter to ‘break’ (separate into fat and milk solids), resulting in a greasy sauce rather than a creamy emulsion. Add one piece of butter, whisk until dissolved, then add the next.
Effortless Variations: Baking, Roasting, and Air Frying
While the stovetop method is the fastest, utilizing the oven or air fryer offers alternative ways to handle larger batches, achieve maximum crispiness on bone-in cuts, or reduce active cooking time.
1. Skillet-to-Oven Method (Best for Bone-In, Skin-On Thighs)
This hybrid technique is perfect for ensuring thick, bone-in thighs are cooked through without compromising the skin’s texture.
-
Steps: Follow the core recipe steps 1 and 2 (Pat Dry and Sear) using bone-in, skin-on thighs, searing for 5-7 minutes per side.
-
Transition: Once the chicken is seared, create the garlic butter sauce around the chicken in the same oven-safe skillet (cast iron is ideal), adding the butter, garlic, and liquids as instructed.
-
Bake: Transfer the skillet to a preheated oven at 400°F (200°C). Bake for 25 to 30 minutes, or until the internal temperature reaches 165°F (74°C). Basting the chicken with the pan juices halfway through will add moisture and flavor.
2. Oven-Roasted Garlic Butter Chicken
This hands-off approach involves coating the chicken in a compound butter and letting the oven do all the work.
-
Prep: Combine softened (room temperature) butter with minced garlic, salt, pepper, and herbs (a small amount of honey can be added to help crisp the skin).
-
Marinate & Roast: Rub this mixture generously all over bone-in, skin-on thighs. Place the chicken on a baking sheet or roasting pan, and pour about ¼ cup of chicken broth around the chicken (not over it) to create a flavorful base sauce and prevent the butter mixture from burning.
-
Bake: Roast at 400°F (200°C) for 35 to 45 minutes, or until cooked through. The juices in the pan will serve as the sauce.
3. Air Fryer Method
For the fastest cleanup and crispiest skin, the air fryer is an excellent choice. This method is best for bone-in, skin-on thighs.
-
Prep: Season the thighs as usual. Skip the initial pan-searing.
-
Air Fry: Preheat the air fryer to 375°F (190°C). Place the thighs skin-side up in a single layer. Cook for 20 to 25 minutes, flipping halfway through, until the skin is golden and the internal temperature is 165°F (74°C).
-
Sauce: While the chicken cooks, prepare the garlic butter sauce separately on the stovetop (Steps 3-5 of the core recipe). Toss the finished chicken in the warm sauce right before serving.
Perfect Pairings and Pro Tips
Garlic butter chicken thighs are incredibly versatile, pairing well with sides that can soak up the excess pan sauce. A few simple additions can also elevate the dish into a complete, sophisticated meal.
Side Dish Suggestions
The richness of the garlic butter sauce calls for simple starches or refreshing vegetables.
-
Starchy Pairings (Sauce Soakers): Sour Cream Mashed Potatoes, Creamy Polenta, Fluffy White Rice, or crusty bread for dipping.
-
Vegetable Pairings (Balance and Color): Roasted asparagus, simple steamed green beans, sautéed spinach with a squeeze of lemon, or a light rocket and tomato salad.
-
Low-Carb Options: Cauliflower rice, zucchini noodles (zoodles), or steamed broccoli.
Pro Tips for Success
-
Use Fresh Herbs: While dried seasoning works for the chicken, finishing with fresh herbs (parsley, thyme, or chives) adds a vibrant aroma and color that enhances the dish.
-
Don’t Waste the Juices: When resting the chicken, the juices that collect on the plate should be poured back into the pan sauce just before serving. These juices are concentrated flavor and will further enrich the sauce.
-
Rest the Meat: After cooking, allow the chicken to rest for 5 minutes before cutting or serving. This crucial step allows the muscle fibers to relax and reabsorb their internal juices, guaranteeing the meat stays tender and moist.
-
Adjusting for Salt: If using salted butter or regular chicken broth, reduce the initial amount of added salt on the chicken. Always taste the final sauce before returning the chicken to the pan and adjust seasoning as necessary.
Storage and Reheating
Garlic butter chicken thighs are best served fresh, but leftovers can be managed easily.
-
Storage: Store cooked chicken and sauce in an airtight container in the refrigerator for up to 3 days.
-
Reheating: Avoid the microwave, which can make the chicken tough and cause the emulsified sauce to break. Reheat gently in an oven preheated to 350°F (175°C) for 10-15 minutes, or in a covered skillet on low heat until warmed through.