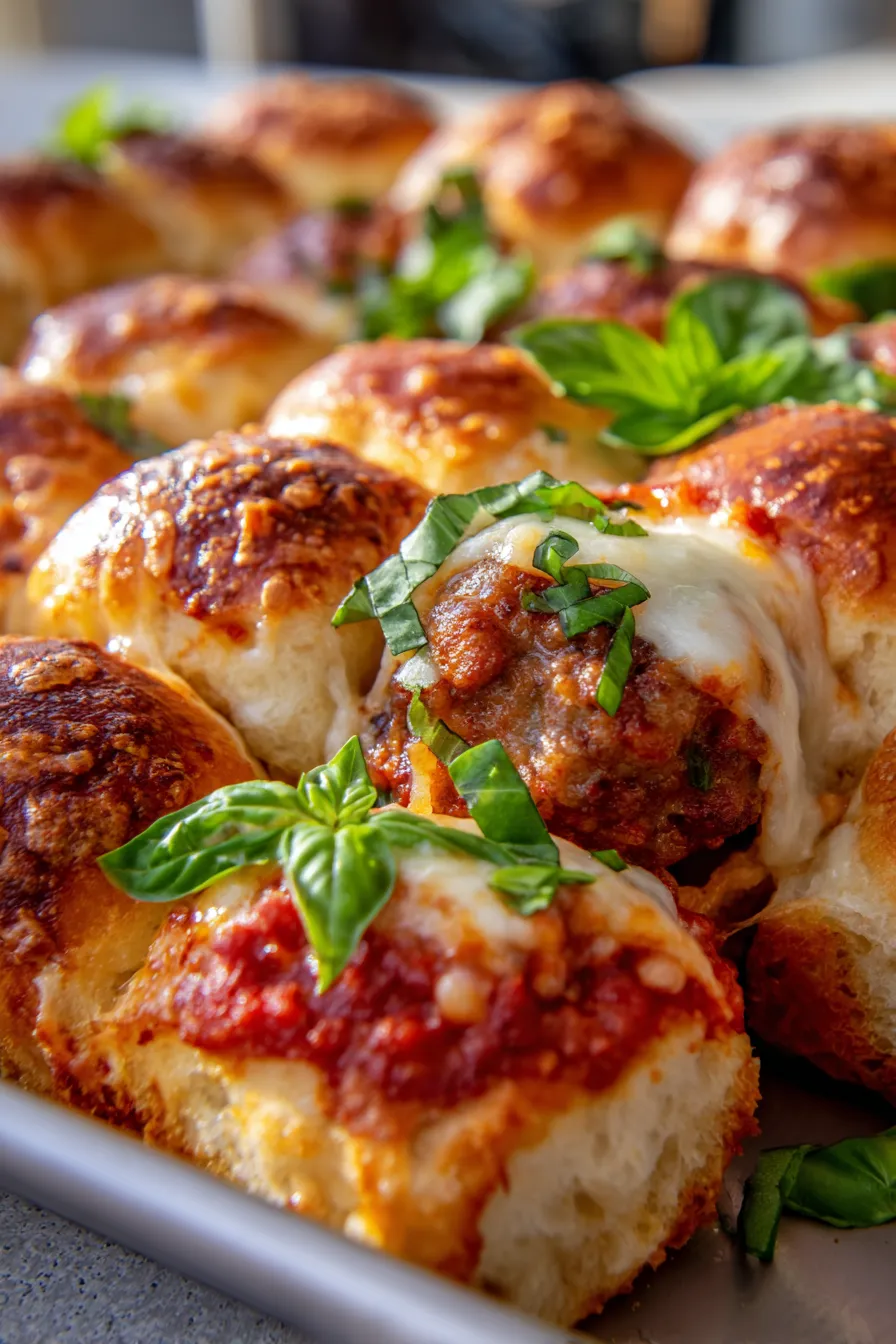
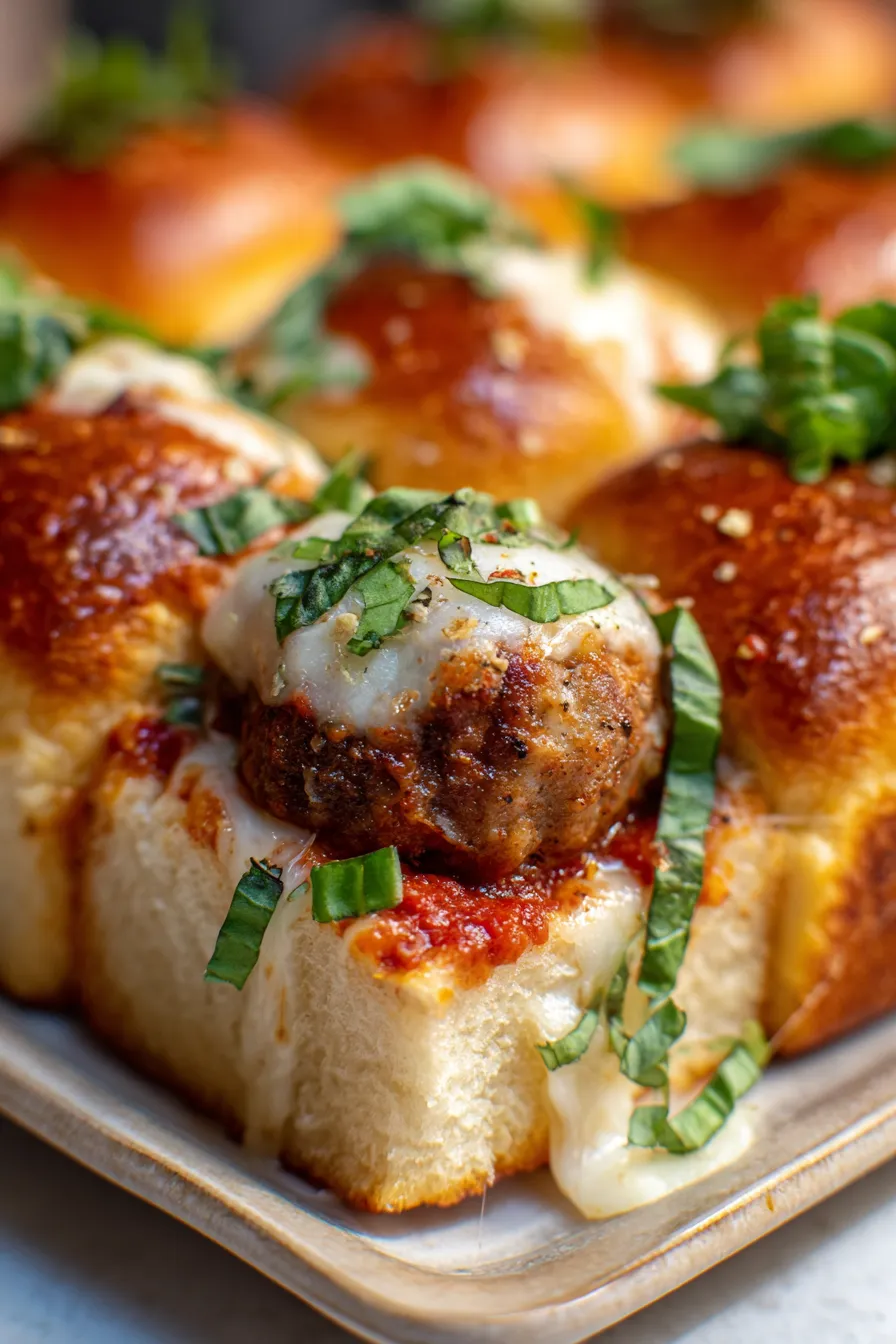
Best Ever Easy Pull-Apart Meatball Sliders – Cheesy, Saucy & Crowd-Pleasing
I remember a particularly blustery autumn Sunday when the rain just wouldn’t let up. My family was gathered, a little antsy, and I needed a quick, comforting meal that would lift everyone’s spirits. That’s when these incredible Easy Pull-Apart Meatball Sliders – Cheesy, Saucy & Crowd-Pleasing came to the rescue. They’re more than just an easy dinner; they’re a hug on a plate.
The aroma of simmering marinara and toasted rolls filled the kitchen, instantly calming everyone. Watching my kids’ faces light up as they pulled apart their own cheesy, saucy slider, completely engrossed in the deliciousness, was pure joy. This recipe isn’t just a crowd-pleaser; it’s a tested, family-favorite sensation that brings everyone together.
Whether you’re planning a game day appetizer, a casual weeknight meal, or a fun party snack, these sliders are guaranteed to be a hit. They’re quick to assemble, bake up beautifully, and disappear even faster. Get ready to add this one to your regular rotation!
Why You’ll Love This Recipe
- ❤️ Effortlessly Easy: Seriously, if you can open a package of rolls and pre-made meatballs, you can make these. Minimal chopping, maximum flavor! It’s the perfect recipe for busy weeknights when you crave something homemade but are short on time.
- ❤️ Ultimate Comfort Food: Warm, gooey cheese, savory meatballs, and soft, slightly crisp rolls soaked in rich marinara. Every bite is a nostalgic trip to your favorite Italian-American eatery, but right in your own kitchen. It truly hits all the right notes for a satisfying meal.
- ❤️ Unbeatable Crowd-Pleaser: These sliders are universally loved by kids and adults alike. Perfect for parties, potlucks, game days, or even a fun family dinner. You’ll be amazed at how quickly a tray of these disappears – they’re always the first to go!
- ❤️ Highly Customizable: While the classic combination is fantastic, these sliders are a blank canvas. Want to add some spice? A different cheese? Veggies? The possibilities are endless. We’ll dive into some fun variations later.
- ❤️ Quick Assembly, Fast Bake: From start to finish, you can have these bubbling, cheesy beauties on your table in under 40 minutes. The assembly takes just minutes, and the oven does most of the work, leaving you more time to enjoy your company (or a quiet moment!).
- ❤️ Perfect for Meal Prep (almost!): While best served warm, they reheat surprisingly well. You can also prep many components ahead of time, like simmering the meatballs, making game day or party day even easier.
- ❤️ Budget-Friendly: Using store-bought meatballs and inexpensive slider rolls makes this a very economical meal option that doesn’t skimp on flavor or satisfaction. You get a lot of bang for your buck with this recipe.
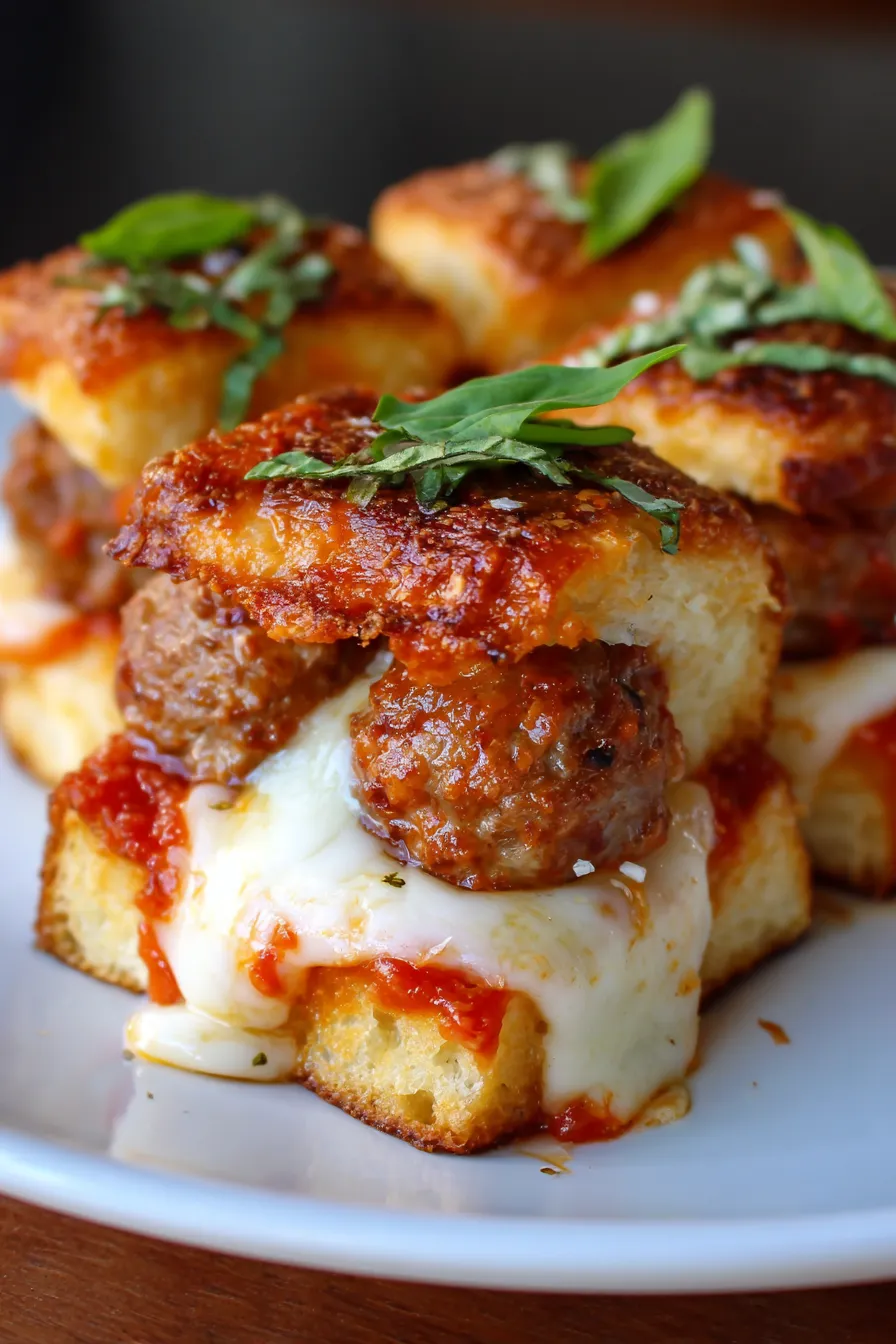
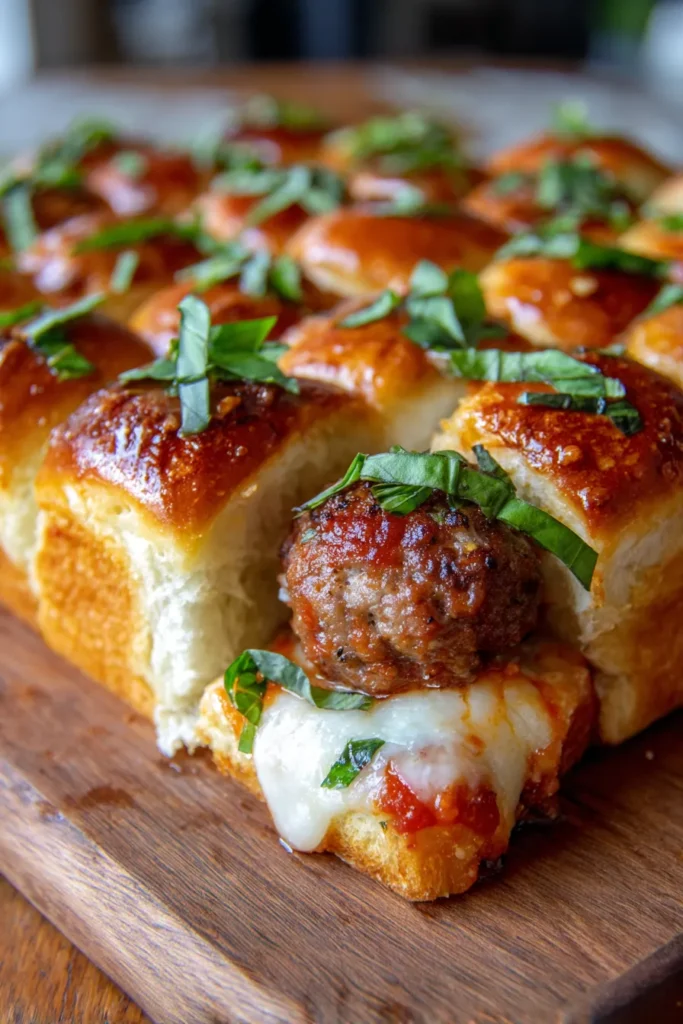
- ❤️ Visually Appealing: Golden-brown rolls, melted cheese stretching, vibrant red sauce peeking through – these sliders look as good as they taste. They’re Instagram-ready and make a beautiful presentation on any buffet table.
- ❤️ Mess-Free Eating (mostly!): Being pull-apart, they’re designed for easy sharing and individual portions. While things can get a little saucy (which is half the fun!), they’re generally less messy than full-sized subs.
What You Need
You only need a few simple pantry staples for this recipe! Check the full printable recipe card below for detailed measurements.
Expert Tips
- 💡 Meatball Magic:
- Homemade vs. Store-Bought: While store-bought frozen meatballs are the ultimate convenience hack for this recipe, don’t shy away from using homemade if you have them! If using frozen, ensure they are fully thawed before assembling to ensure even heating. You can even give them a quick simmer in the sauce beforehand for extra flavor absorption.
- Size Matters: Use smaller meatballs (about 1 to 1.5 inches) for the best fit on slider rolls. If your meatballs are larger, you might need to slice them in half to prevent the sliders from being too bulky and difficult to eat.
- Flavor Boost: Before assembling, simmer your thawed meatballs in the marinara sauce for at least 15-20 minutes. This infuses them with incredible flavor and ensures they’re piping hot and tender when they go into the oven. It’s a small step that makes a huge difference!
- 💡 Sauce Savvy:
- Quality Marinara: A good quality marinara sauce is key here. Choose your favorite brand, or make your own if you have the time! If your sauce is a bit thin, simmer it gently to reduce it slightly, concentrating the flavors.
- Season to Taste: Don’t be afraid to enhance your store-bought marinara. A pinch of red pepper flakes for a little kick, a sprinkle of dried oregano or basil, or even a touch of sugar to balance acidity can elevate the flavor profile significantly.
- Don’t Over-Sauce: While you want them saucy, too much sauce can make the rolls soggy. Spread a generous but even layer on the bottom rolls, then spoon a bit more over the meatballs before topping with cheese. The top rolls will absorb some sauce from the meatballs.
- 💡 Cheese Please:
- Shred Your Own: Pre-shredded cheese often contains anti-caking agents that can prevent it from melting as smoothly. For the ultimate gooey pull, shred your own mozzarella and provolone from a block.
- Layering is Key: Don’t just dump the cheese on. A layer of provolone on the bottom rolls acts as a barrier and adds a sharp, delicious flavor, while mozzarella on top gives you that classic stretchy pull. Consider a third cheese, like a sprinkle of Parmesan, for an extra nutty, savory note.
- Don’t Skimp: This is a cheesy slider recipe! A generous amount of cheese is what makes them so irresistible. Aim for a good, even blanket over all the meatballs.
- 💡 Roll Call:
- Hawaiian Sweet Rolls: These are my absolute favorite for sliders. Their slight sweetness perfectly complements the savory meatballs and tangy sauce. They also toast beautifully and stay soft in the middle.
- Don’t Separate: The “pull-apart” magic happens because you keep the rolls connected during assembly and baking. Slice the entire block of rolls in half horizontally using a serrated knife.
- Buttery Top: The buttery garlic topping isn’t just for flavor; it helps the rolls achieve that beautiful golden-brown crust and prevents them from drying out. Don’t skip it! Brush it generously, getting into all the crevices.
- 💡 Baking Brilliance:
- Cover, Then Uncover: Start by baking the sliders covered with foil. This traps steam, ensuring the rolls stay soft and the cheese melts perfectly without browning too quickly. Then, remove the foil for the last 5-10 minutes to get that gorgeous golden-brown top and slightly crispy edges.
- Watch for Browning: Ovens vary! Keep an eye on your sliders during the uncovered baking stage to prevent the tops from getting too dark.
- Resting Period: Let the sliders rest for 5 minutes out of the oven before serving. This allows the cheese to set slightly, making them easier to pull apart and less likely to fall apart entirely. It also prevents burnt tongues!
- 💡 Serving Suggestions:
- Garnish for Freshness: A sprinkle of fresh chopped parsley or basil not only adds a pop of color but also a burst of fresh flavor that cuts through the richness.
- Dipping Delight: Offer extra marinara sauce on the side for dipping. A sprinkle of Parmesan cheese on top of the finished sliders is also a lovely touch.
- Sides: Serve with a simple green salad, some crispy potato chips, or even a bowl of warm tomato soup for a full comfort meal.
Variations & Substitutions
- Spicy Kick: Add a pinch of red pepper flakes to your marinara sauce or serve with a side of hot giardiniera.
- Cheese Swap: Experiment with provolone, fontina, gruyere, or even a sharp cheddar for different flavor profiles. A sprinkle of grated Parmesan adds a salty, umami boost.
- Meatball Makeover:
- Turkey or Chicken: Use ground turkey or chicken meatballs for a lighter option.
- Veggie Meatballs: For a vegetarian version, use your favorite store-bought or homemade veggie meatballs.
- Roll Options: While Hawaiian rolls are supreme, brioche slider buns or even small potato rolls work well too.
- Add Veggies: Sautéed bell peppers, onions, or mushrooms can be layered in with the meatballs for extra flavor and nutrition.
- Pesto Power: Drizzle a little pesto over the meatballs before adding the cheese for an herbaceous twist.
- Gluten-Free: Use gluten-free slider buns or rolls. Ensure your meatballs and marinara sauce are also certified gluten-free.
- Dairy-Free: Use plant-based cheese shreds and ensure your rolls are dairy-free. Some brands of plant-based mozzarella melt surprisingly well!
Storage & Freezing
- Storage: Leftover meatball sliders can be stored in an airtight container in the refrigerator for up to 3-4 days.
- Reheating: Reheat in the microwave until warmed through (rolls might get a little soft) or in the oven at 300°F (150°C) for about 10-15 minutes, covered with foil, until heated through and cheese is re-melted.
- Freezing: While it’s best to enjoy these fresh, you can freeze fully cooked and cooled sliders. Wrap them tightly in plastic wrap and then in foil. They’ll keep for up to 2 months. Thaw overnight in the fridge and reheat as above. Be aware that the rolls might be a bit softer upon reheating from frozen.
FAQ
Q: Can I use fresh meatballs instead of frozen?
A: Absolutely! If using raw homemade meatballs, you’ll need to cook them through first (either pan-fry or bake) before adding them to the sauce and assembling the sliders. Otherwise, they won’t cook evenly in the oven.
Q: What kind of rolls are best for these sliders?
A: Hawaiian sweet rolls are highly recommended due to their soft texture and touch of sweetness that perfectly complements the savory meatballs. However, any small slider-style bun will work.
Q: How do I prevent the rolls from getting soggy?
A: A few tricks! Don’t overdo the sauce, especially on the bottom layer. You can also lightly toast the bottom halves of the rolls in a dry pan or under the broiler for a minute or two before assembly to create a slight barrier. Layering a slice of provolone directly on the bottom bun can also help.
Q: Can I make these ahead of time?
A: You can assemble the sliders up to a few hours ahead of time and keep them covered in the refrigerator. Add the butter topping just before baking. For best results, I recommend baking them fresh right before serving. You can also cook the meatballs in the sauce a day or two in advance.
Q: What’s the best way to serve these for a party?
A: Bake them in a disposable aluminum pan for easy transport and cleanup. Keep them warm in a low oven (around 200°F/95°C) until serving time. Have plenty of napkins ready!
Conclusion
There you have it – a recipe that promises big flavor with minimal fuss. These Easy Pull-Apart Meatball Sliders are truly a testament to how simple ingredients can create something extraordinary. I hope they bring as much joy and deliciousness to your table as they do to mine. Don’t forget to share your creations and pin this recipe for your next gathering!
Easy Pull-Apart Meatball Sliders: Cheesy, Saucy & Simple
Ingredients
- 12 Hawaiian sweet rolls (1 package)
- 1 lb frozen cooked meatballs, thawed
- 1.5 cups marinara sauce
- 1 cup shredded mozzarella cheese
- 0.5 cup sliced provolone cheese
- 4 tbsp unsalted butter, melted
- 1 tsp garlic powder
- 0.5 tsp dried parsley flakes
- Fresh parsley or basil, for garnish (optional)
Instructions
- Step 1 Preheat oven to 350°F (175°C). Line a 9x13 inch baking dish with parchment paper or spray with cooking spray.
- Step 2 Slice the entire block of Hawaiian rolls horizontally in half, keeping them connected. Place the bottom halves into the prepared baking dish.
- Step 3 Spread half of the marinara sauce evenly over the bottom rolls.
- Step 4 Arrange the thawed meatballs over the sauce. Top with the remaining marinara sauce, ensuring meatballs are well-coated.
- Step 5 Layer the provolone slices over the meatballs, then sprinkle evenly with shredded mozzarella cheese.
- Step 6 Place the top halves of the rolls back on. In a small bowl, whisk together the melted butter, garlic powder, and dried parsley. Brush this mixture generously over the tops of the rolls.
- Step 7 Cover the baking dish loosely with aluminum foil. Bake for 15 minutes.
- Step 8 Remove the foil and bake for another 10-15 minutes, or until the tops are golden brown and the cheese is bubbly and melted.
- Step 9 Let cool for 5 minutes before pulling apart and serving. Garnish with fresh parsley or basil, if desired.