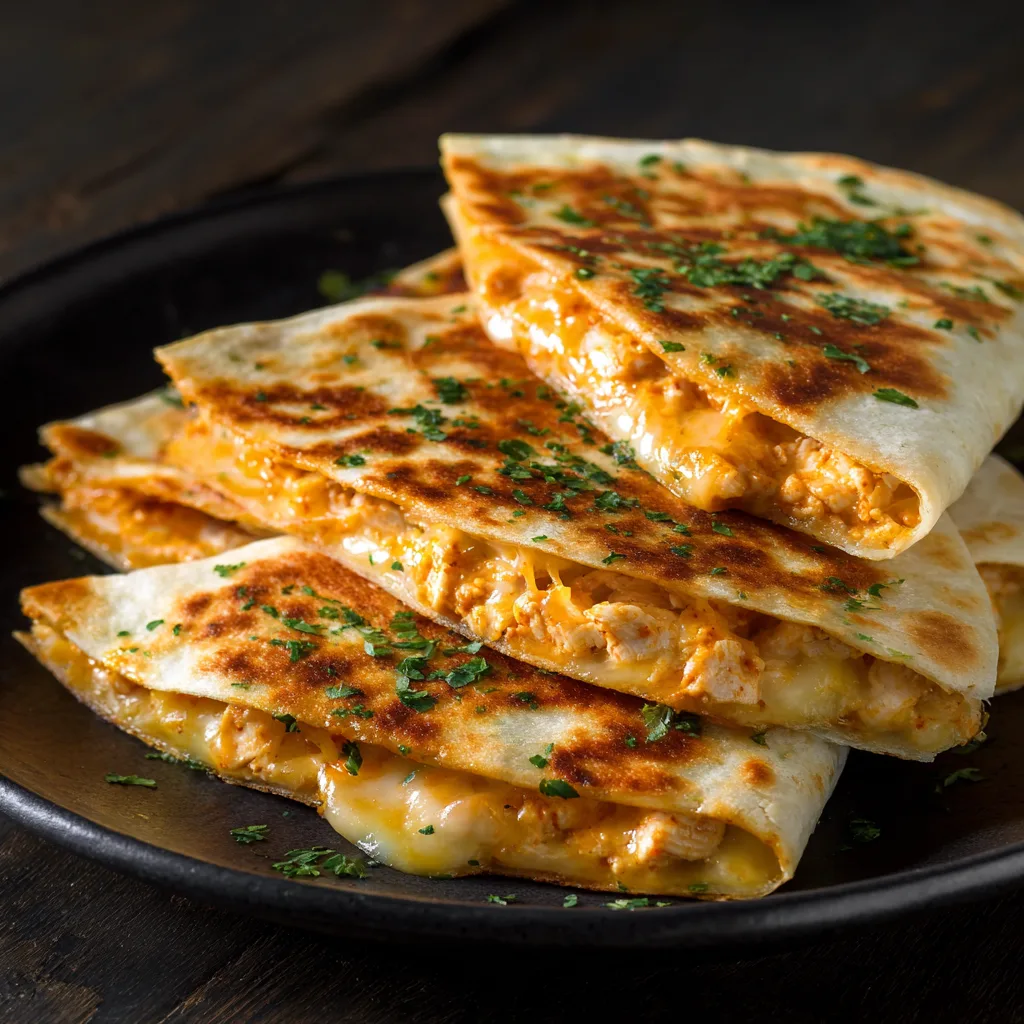
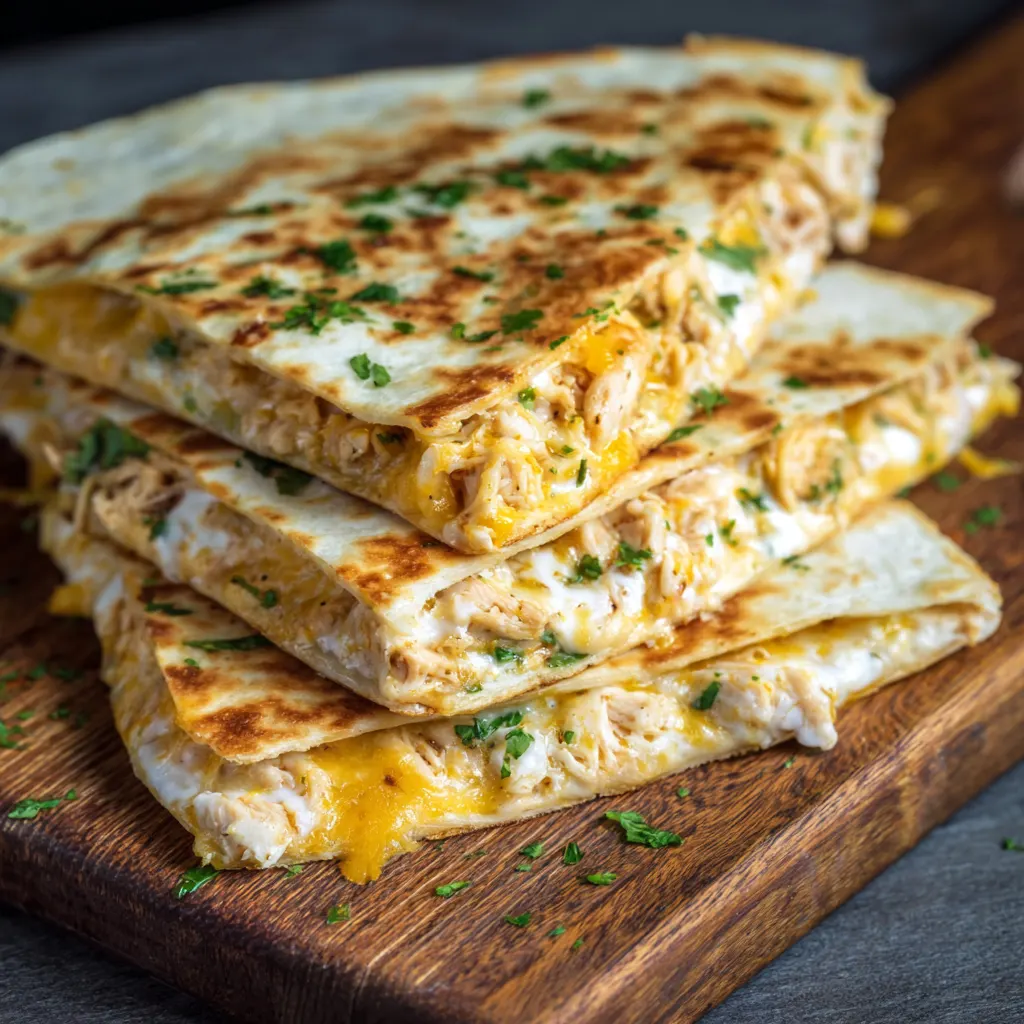
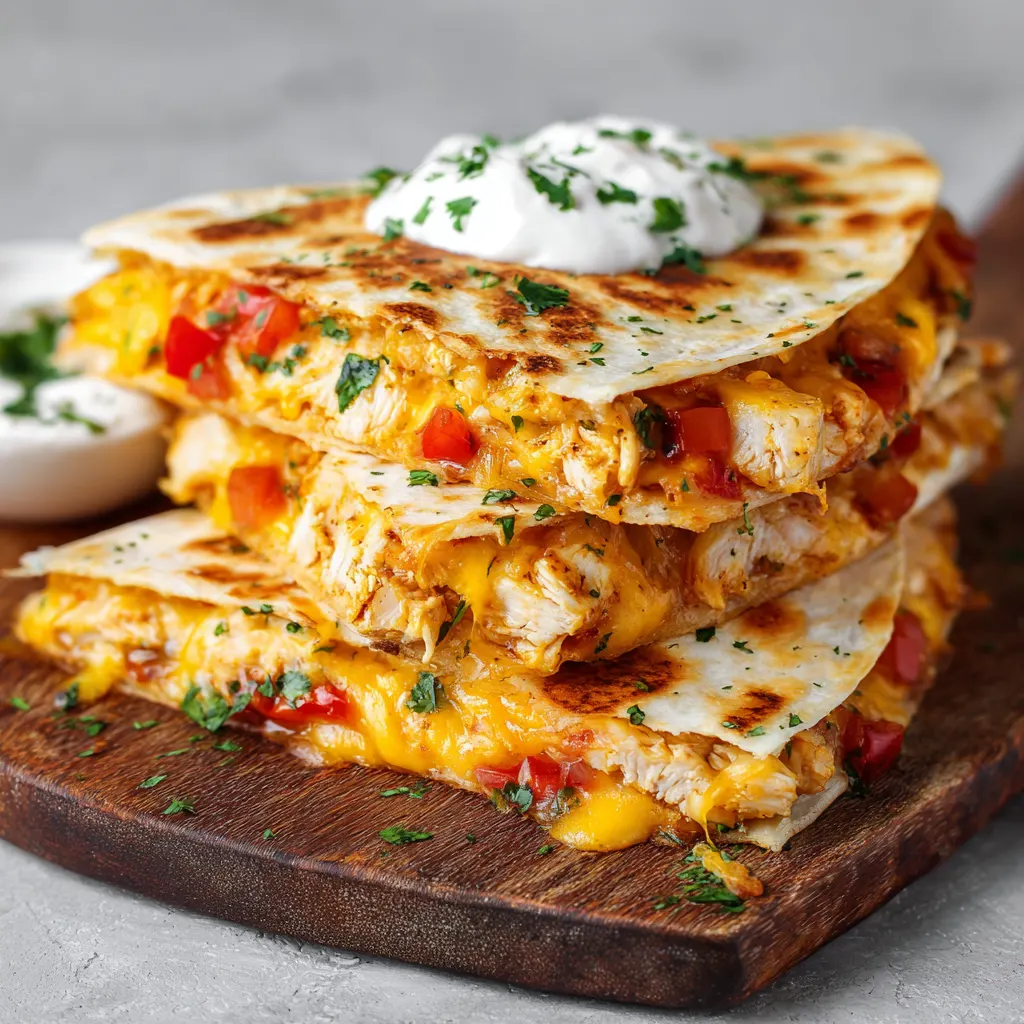
The chicken quesadilla is arguably the perfect quick-fix meal: comforting, infinitely customizable, and ready in minutes. Translating literally to “little cheese thing,” this Mexican staple delivers a satisfying combination of golden, crispy tortilla, savory seasoned chicken, and a gooey, molten cheese core. While fast food versions fall flat, a homemade cheesy chicken quesadilla is a midweek dinner game-changer, especially when utilizing time-saving hacks like pre-cooked chicken. Follow this foundational recipe to achieve restaurant-quality crunch and flavor every single time.
Ingredients
-
For the Base:
-
4 large flour tortillas (burrito or soft taco size)
-
2 tablespoons butter or olive oil, divided (for cooking)
-
-
For the Filling:
-
2 cups cooked chicken, shredded (rotisserie chicken is ideal)
-
2 cups freshly shredded cheese (a blend of Monterey Jack, Pepper Jack, and Sharp Cheddar is recommended)
-
1/2 cup diced onion and bell pepper mix (optional, sautéed)
-
1/4 cup diced green chilies (canned, drained)
-
-
For the Seasoning Blend:
-
1 teaspoon taco seasoning
-
1/2 teaspoon garlic powder
-
1/4 teaspoon cumin
-
Pinch of salt and black pepper
-
Step-by-Step Instructions
1. Prepare the Filling:
In a medium bowl, combine the shredded chicken, diced green chilies, and any sautéed vegetables. Sprinkle the taco seasoning, garlic powder, cumin, salt, and pepper over the mixture. Toss thoroughly to ensure the chicken is evenly coated with the spices.
2. Assemble the Quesadilla:
Heat 1 teaspoon of butter or oil in a large non-stick skillet or griddle over medium-low heat. Lay one tortilla flat in the pan. Sprinkle a layer of cheese (about 1/4 cup) evenly over one half of the tortilla. This first layer acts as the glue. Spoon 1/4 of the seasoned chicken mixture over the cheese. Top the chicken with another layer of cheese (about 1/4 cup). Fold the empty side of the tortilla over the filling to create a half-moon shape.
3. Cook for Crispness:
Cook the quesadilla for 3 to 4 minutes on the first side, pressing down gently with a spatula to encourage melting and browning. The heat should be low enough to melt the cheese completely before the tortilla burns. When the underside is golden brown and crispy, carefully flip the quesadilla using the spatula. Cook the second side for 2 to 3 minutes until it is equally golden and the cheese is oozing.
4. Slice and Serve:
Transfer the finished quesadilla to a cutting board. Repeat the cooking process with the remaining tortillas, adding a small amount of butter or oil to the pan for each one. Once cooled slightly, slice each quesadilla into three or four wedges and serve immediately with your favorite toppings.
Mastering the Melt: The Science of a Perfect Crisp
Achieving a truly professional-grade quesadilla involves understanding a few key techniques centered on heat management and ingredient selection. The goal is a perfect contrast: maximum gooey cheese inside and maximum golden crispness outside.
The Role of Freshly Shredded Cheese
This is arguably the single most important tip for a superior quesadilla. Pre-shredded, store-bought cheeses are typically coated in anti-caking agents like potato starch or cellulose. While harmless, these agents actively inhibit the cheese’s ability to melt smoothly and fully. By purchasing a block of cheese (such as Monterey Jack, Colby, or Cheddar) and shredding it yourself, you ensure a creamy, gooey melt that binds the filling together beautifully and delivers an irresistible cheese pull. A blend of high-moisture melting cheese (like Jack or Oaxaca) and a flavorful, harder cheese (like Sharp Cheddar) provides the best texture and taste.
Heat is Everything
The common mistake when cooking a quesadilla is using heat that is too high. High heat burns the tortilla before the cheese has a chance to fully liquefy. Instead, cook on medium to medium-low heat. This patient approach allows the skillet to transfer heat slowly and evenly, ensuring the interior reaches the optimal temperature for melting the cheese into a gooey binder, while the exterior slowly toasts to a beautiful, golden-brown crust.
The Butter and Press Technique
Toasting the tortilla in fat is essential for crispness. Using a mixture of oil or butter gives the exterior a rich, golden color and depth of flavor. Butter is often preferred for its nutty taste and ability to promote superior browning.
During cooking, gently pressing the quesadilla with a flat spatula serves two crucial purposes:
-
Ensuring Contact: It flattens the quesadilla, ensuring maximum surface area contact with the hot pan for even crisping.
-
Binding: It helps the melting cheese flow into every crevice of the chicken filling, creating a solid, cohesive disk that won’t fall apart when flipped or sliced.
The Signature Cheese Crust
For an advanced level of crispiness, don’t worry if a small amount of cheese spills out onto the hot pan edges. As the cheese melts onto the skillet, it fries, creating a crispy, caramelized “cheese crust” that is an absolute delight. Once cooked, simply peel this crunchy bonus away and serve it alongside the wedges, or keep it attached for an extra-crisp border.
Beyond Basic: Flavor Customization and Filling Upgrades
While the classic chicken and cheese combination is timeless, the quesadilla’s versatility makes it the perfect vehicle for culinary experimentation. Customizing the filling allows you to adjust the spice, texture, and nutritional value of your meal.
Elevating the Chicken Flavor
If you choose to cook your chicken from scratch rather than using rotisserie, you have the opportunity to infuse deep flavor.
-
Marinating: Dice or shred chicken breasts or thighs and marinate them briefly in a simple mix of lime juice, cumin, chili powder, and olive oil before sautéing.
-
Sautéing Veggies: Cooking aromatics like diced onions, red bell peppers, and jalapeños first allows them to soften and release their flavors into the cooking oil, which then coats the chicken. Adding a can of diced green chilies right at the end introduces a mild, earthy heat.
-
Building a Sauce Base: For a creamier, richer filling that rivals restaurant quality, consider mixing the shredded chicken with a binder before stuffing the tortilla. Popular options include:
-
Spicy Mayo Blend: Mayonnaise, a dash of hot sauce (like Sriracha or Valentina), and extra taco seasoning.
-
Cream Cheese Sauce: A tablespoon of softened cream cheese mixed with tomato paste, minced garlic, and paprika. This creates a luxurious, cohesive filling that melts beautifully with the shredded cheese.
-
The Art of the Side Dish: Essential Pairings
A quesadilla is more than a sandwich; it’s an experience best served with contrasting, cool, and vibrant accompaniments. The right toppings and side dishes cut through the richness of the cheese and the savory filling, providing balance and complexity.
Essential Toppings and Dipping Sauces
Every great quesadilla deserves a cool, creamy element and a bright, acidic counterpoint.
-
Sour Cream or Greek Yogurt: The classic cool, creamy dip. For a lighter, tangier option, substitute plain Greek yogurt, which provides a similar texture and a protein boost. For added flavor, stir in a squeeze of lime juice and a dash of cumin.
-
Fresh Salsa or Pico de Gallo: The acidity and freshness of chopped tomatoes, onions, cilantro, and lime juice offer a necessary contrast to the richness of the cheese. Choose a thick, chunky salsa to avoid making the quesadilla soggy.
-
Guacamole or Avocado: The buttery, rich texture of avocado provides healthy fat and depth. Either slice avocado thinly to place inside the quesadilla before cooking, or serve a chunky guacamole on the side.
-
Queso Dip: While doubling down on cheese, a warm, spiced queso dip elevates the meal from casual dinner to a decadent indulgence, perfect for a game day appetizer.
Pairing with Traditional Mexican Sides
To build a full, hearty meal, incorporate light side dishes that complement the main event.
-
Mexican Rice (Arroz Mexicano): A flavorful side cooked with tomatoes, onion, and spices, adding substance and tradition to the plate.
-
Refried Beans: A simple, savory side that can be served warm with a sprinkle of cojita cheese.
-
Simple Green Salad: A basic mix of shredded lettuce and a light vinaigrette (lime juice and oil) offers a refreshing crunch and palate cleanser.
Prep, Store, and Serve: Handling Large Batches and Leftovers
Chicken quesadillas are incredibly practical, lending themselves well to meal preparation, batch cooking, and storing for later. Knowing how to correctly handle and reheat them ensures that every quesadilla maintains its crispy texture.
Make-Ahead and Storage Tips
The main components of the quesadilla can be prepped days in advance, significantly reducing the cooking time.
-
Filling Prep: The seasoned chicken mixture (with or without vegetables) can be stored in an airtight container in the refrigerator for up to 3 days. When ready to cook, simply scoop the cold mixture onto the tortilla.
-
Refrigerating Cooked Quesadillas: Cooked quesadillas can be stored in the refrigerator for 2 to 3 days. Allow them to cool completely before placing them in an airtight container, separated by parchment paper to prevent sticking.
Freezing for the Future
Quesadillas freeze exceptionally well, making them an excellent choice for a freezer meal stash.
-
Cool Completely: Ensure the cooked quesadillas are fully cooled.
-
Flash Freeze: Place the whole, uncut quesadillas on a parchment-lined baking sheet and place them in the freezer for about an hour until firm. This prevents them from sticking together.
-
Wrap and Store: Wrap each quesadilla individually in plastic wrap, then place them all into a heavy-duty freezer bag or freezer-safe container. They can be stored for up to three months.
Reheating for Maximum Crunch
Never rely solely on the microwave to reheat a quesadilla, as it makes the tortilla soggy.
-
For Refrigerated Leftovers: Place the quesadilla in a non-stick skillet over medium-low heat. Reheat for 2-3 minutes per side until the filling is warmed through and the exterior has re-crisped.
-
For Frozen Quesadillas: Do not thaw. Place the frozen quesadilla in the microwave for 30–60 seconds to soften the filling slightly, then immediately transfer it to a hot skillet (with a little butter or oil) and cook over medium heat for 3-4 minutes per side until the cheese is re-melted and the tortilla is golden brown and crunchy.
-
Batch Reheating (Oven Method): If reheating a large batch, preheat your oven to 350°F (175°C). Place the quesadilla wedges directly on a wire rack set over a baking sheet. Bake for 10-15 minutes until hot and crispy. The rack allows air to circulate, keeping the bottom from getting soggy.