Best Ever Hawaiian Roll Grilled Cheese Sliders: Your Ultimate Comfort Food Craving!
Oh, those gloomy, rainy Sunday afternoons! You know the kind, where the sky is just one big blanket of grey, and all you want to do is curl up on the couch with a good book… and something utterly delicious. That’s exactly when these Hawaiian Roll Grilled Cheese Sliders first made their grand appearance in my kitchen. My kiddos were bouncing off the walls, tired of indoor play, and I knew a quick, cheesy, and incredibly comforting meal was just the ticket to turn those frowns upside down. It was a moment of pure culinary magic, turning a simple grilled cheese into an irresistible easy dinner that instantly became a family favorite.
There’s something truly special about the way the sweet, fluffy King’s Hawaiian rolls perfectly complement the gooey, savory melted cheese. It’s not just a meal; it’s an experience. Each slider is a miniature explosion of flavor and texture, from the lightly crisped, buttery top to the stretchy, golden cheese pull inside. This isn’t your average grilled cheese, friends; it’s a gourmet upgrade designed for maximum enjoyment with minimal effort.
Since that first rainy-day triumph, this recipe has been tested and perfected countless times, becoming a staple for everything from busy weeknights to casual gatherings. It’s the ultimate comfort food solution, always delivering smiles and satisfied sighs. Get ready to dive into the easiest, most delicious sliders you’ll ever make!
Why You’ll Love This Recipe
❤️ Here are just a few reasons why these Hawaiian Roll Grilled Cheese Sliders are about to become your new kitchen obsession:
- Effortlessly Easy & Quick: Seriously, this recipe practically makes itself! With just a handful of ingredients and minimal hands-on time, you can whip up a batch of these glorious sliders in under 30 minutes. It’s perfect for those chaotic weeknights when you need dinner on the table FAST, or when unexpected guests drop by and you want to impress without the stress. Simply assemble, bake, and watch the magic happen in your oven.
- The Ultimate Crowd-Pleaser: Who doesn’t love grilled cheese? And who doesn’t adore Hawaiian rolls? Combine them, and you have an undisputed champion of flavor that appeals to everyone from picky toddlers to gourmet-loving adults. These sliders disappear faster than you can say “more cheese, please!” They’re ideal for game days, potlucks, kid’s parties, or just a cozy family movie night. Prepare for rave reviews and requests for the recipe!
- Sweet & Savory Perfection: The star of the show here is the incredible contrast between the tender, slightly sweet King’s Hawaiian rolls and the rich, savory blend of gooey cheeses. That hint of sweetness in the bread elevates the classic grilled cheese experience to a whole new level, creating a balanced and utterly addictive flavor profile that keeps you reaching for just one more.
- Fantastically Versatile: While the basic recipe is pure perfection, these sliders are also a fantastic canvas for your culinary creativity. Want to add some spice? A dash of hot sauce in the butter. Craving some protein? Layer in some deli ham or turkey. They’re incredibly adaptable to whatever you have on hand or whatever your taste buds are desiring. We’ll dive into more variations later!
- Minimal Cleanup: One of the unsung heroes of this recipe is how little mess it creates. Everything bakes in one dish, meaning less scrubbing and more time enjoying your delicious creations (or relaxing on the couch, no judgment!). It’s a win-win for busy cooks who dread the post-dinner cleanup.
- Nostalgic Comfort, Elevated: It takes the simple, beloved grilled cheese sandwich of your childhood and gives it a sophisticated, yet still incredibly approachable, twist. It’s warm, it’s cheesy, it’s comforting – all the things you love about a classic, but with that irresistible Hawaiian roll sweetness and a bake-and-serve convenience that makes it feel fresh and exciting. It’s the ultimate hug in food form.
What You Need
You only need a few simple pantry staples for this recipe! Check the full printable recipe card below for detailed measurements.
Expert Tips
💡 To ensure your Hawaiian Roll Grilled Cheese Sliders turn out absolutely perfect every single time, keep these expert tips in mind:
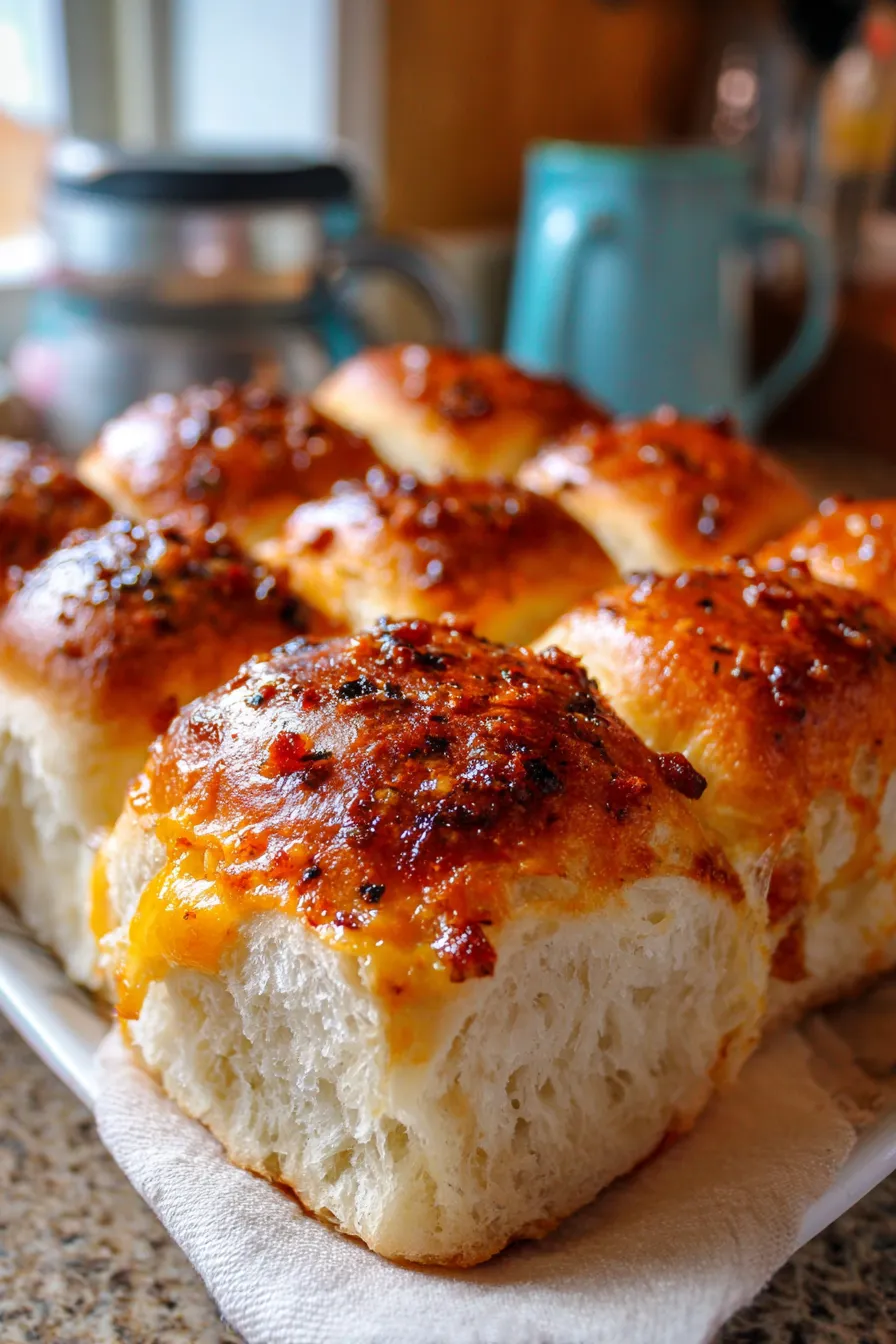
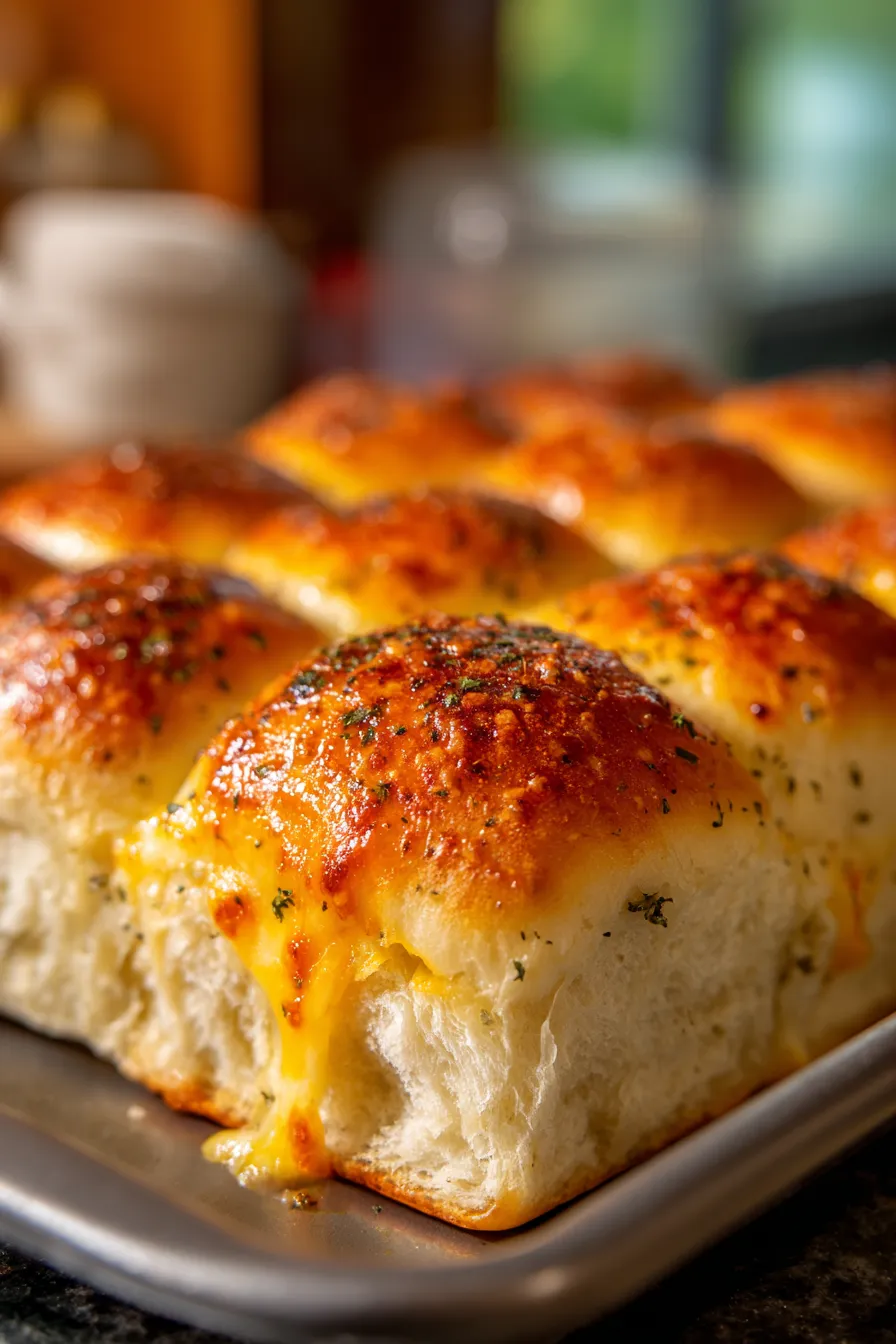
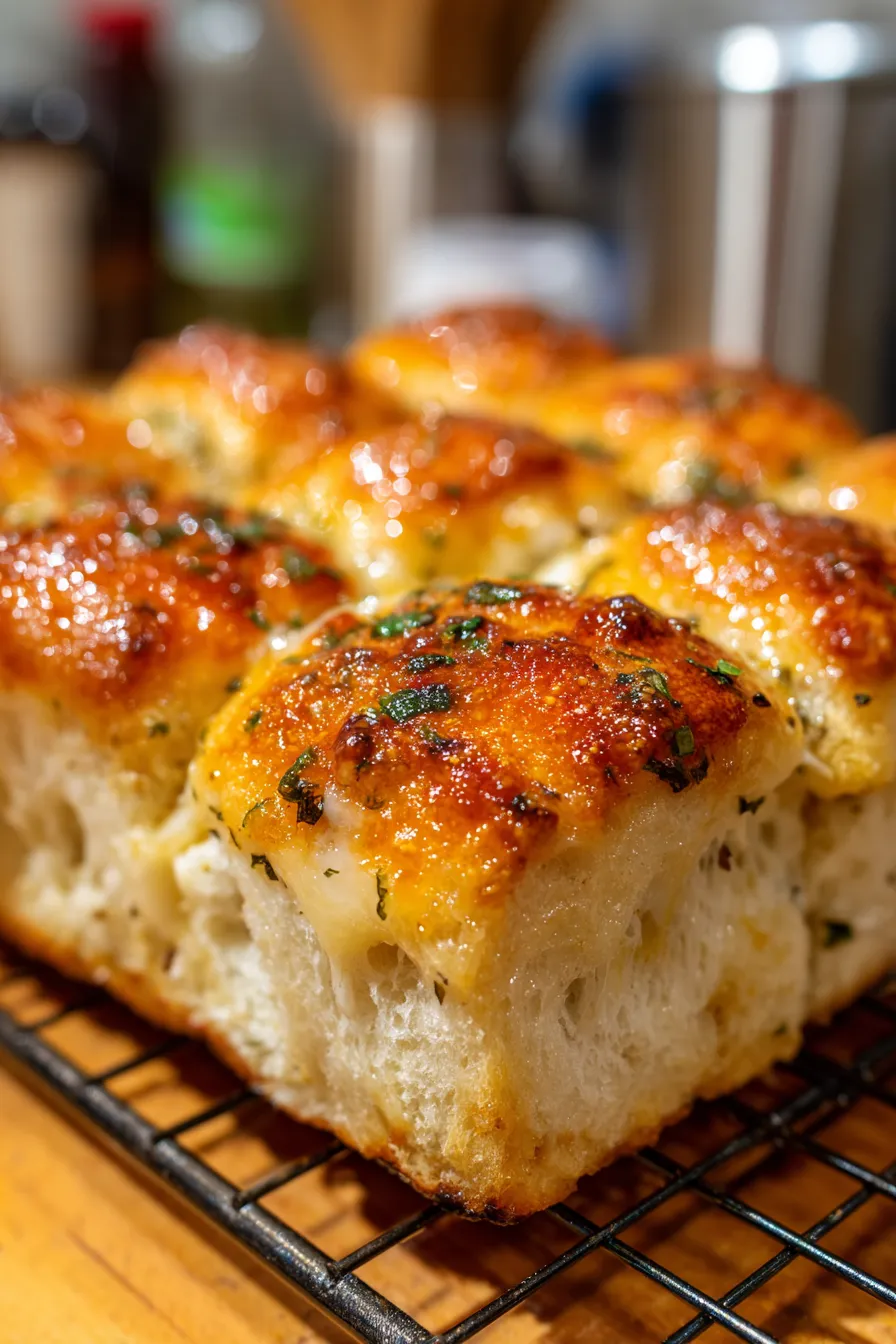
- The Butter is Key (and Flavorful!): Don’t skimp on the butter! A generous coating not only helps crisp up the rolls to a beautiful golden brown but also infuses them with rich flavor. My secret? I love to melt my butter and then whisk in a little Dijon mustard, garlic powder, and onion powder. This adds an incredible depth of savory, tangy flavor that takes the sliders from great to absolutely unforgettable. Brush evenly over both the bottom and top halves of the rolls for maximum deliciousness. Make sure every crevice gets a brush of that buttery goodness!
- Cheese Blend for Maximum Melty Magic: While any good melting cheese will work, a blend is always better. I adore a combination of sharp cheddar for tang, provolone for its amazing melt and mild flavor, and mozzarella for that ultimate gooey, stretchy cheese pull. Feel free to experiment with Gruyere, Monterey Jack, or even a spicy pepper jack for a kick. Layer them strategically for an even melt, ensuring edge-to-edge cheesiness in every bite.
- Pre-slice Your Rolls Correctly: The beauty of Hawaiian rolls is that they come connected. The easiest way to prepare them is to slice the entire block horizontally through the middle using a large serrated knife. This keeps all the rolls intact and makes assembling the sliders a breeze. Don’t separate them until after baking! This ensures they stay together during cooking and lets the cheese melt evenly across the entire slab.
- Cover, Then Uncover for Perfection: To achieve that perfect balance of gooey melted cheese and crispy golden tops, you’ll want to bake your sliders in two stages. Start by covering the baking dish tightly with aluminum foil. This traps the steam, ensuring the cheese melts beautifully without the bread getting too dark too quickly. After about 15 minutes, remove the foil and let them bake uncovered for another 10-15 minutes. This is when the tops will turn that irresistible golden brown and crisp up slightly, giving you the best of both worlds.
- Don’t Overcrowd the Pan: While you want your sliders to fit snugly in the baking dish, avoid cramming them in too tightly. A standard 12-pack of Hawaiian rolls fits perfectly in a 9×13 inch baking dish. This allows for even heat distribution and ensures all the rolls get beautifully golden and the cheese melts uniformly.
- Let Them Rest: I know, the aroma is intoxicating, and you’ll want to dive in immediately! But resist the urge for just 5 minutes after pulling them from the oven. This resting time allows the cheese to set slightly, making for cleaner cuts and preventing all that glorious melted cheese from oozing out the moment you slice them. It also makes them easier to handle and serve.
- Serving Suggestions: These sliders are fantastic on their own, but they also pair wonderfully with a simple side. Think a fresh green salad with a light vinaigrette to cut through the richness, a bowl of creamy tomato soup for the ultimate comfort combo, or even some crispy potato chips. They’re also brilliant alongside a platter of fresh fruit for a lighter touch.
- Consider a Glaze Brush: For an extra glossy, slightly more savory crust, you can make a simple glaze with melted butter, a touch of Worcestershire sauce, and a sprinkle of dried minced onion flakes. Brush this over the tops of the rolls just before the final uncovered baking stage. It adds another layer of flavor and a beautiful sheen.
Variations & Substitutions
- Add Protein: Elevate your sliders with some delicious additions! Layer in thinly sliced deli ham, turkey, roast beef, or even cooked crumbled bacon before adding the top buns. This transforms them into a more substantial meal, perfect for lunch or dinner.
- Spice It Up: If you love a little heat, mix a pinch of red pepper flakes or a dash of hot sauce into your melted butter mixture. You could also use Pepper Jack cheese for an internal kick!
- Go Green: Finely chopped scallions, chives, or even a thin layer of spinach can be added between the cheese layers for a pop of color and freshness. Sliced tomatoes or caramelized onions would also be incredible.
- Different Cheeses: Don’t limit yourself to cheddar, provolone, and mozzarella! Try Swiss, Gouda, Fontina, Colby Jack, or a sharp white cheddar. Each cheese brings its own unique flavor profile and melt factor.
- Gluten-Free Option: For a gluten-free version, simply substitute the Hawaiian rolls with your favorite gluten-free slider buns or even thicker slices of gluten-free bread cut into squares. Adjust baking time as needed, as GF breads can sometimes crisp up faster.
- Vegan-Friendly: While this recipe is inherently dairy-heavy, you can absolutely make a delicious vegan version! Use your favorite plant-based butter substitute and a blend of high-quality vegan cheeses (Violife, Miyoko’s, Daiya Cutting Board Shreds are popular choices). Ensure your Hawaiian rolls are vegan (some brands are, some aren’t, or use another sweet vegan bread).
- Herbaceous Twist: Mix dried herbs like oregano, basil, or Italian seasoning into your melted butter for an aromatic boost. A sprinkle of fresh parsley or chives after baking adds a lovely fresh finish.
- Breakfast Sliders: For a morning twist, layer scrambled eggs and cooked breakfast sausage or bacon between the cheese. These are perfect for brunch!
Storage & Freezing
Got leftovers? Lucky you! These Hawaiian Roll Grilled Cheese Sliders are best enjoyed fresh and warm from the oven, when the cheese is at its peak gooeyness and the rolls are perfectly crisp. However, if you do have any remaining, they can be stored in an airtight container in the refrigerator for up to 2-3 days.
To reheat, you have a few options: a quick pop in the microwave will warm them through, but for best results (to maintain some crispness), I recommend reheating them in a toaster oven or conventional oven at 300°F (150°C) for about 5-10 minutes, or until warmed through and the cheese is soft again. You can also lightly pan-fry them in a non-stick skillet for a few minutes per side until heated through.
Freezing is generally not recommended for grilled cheese sliders, as the bread can become soggy and the cheese texture can change upon thawing and reheating. It’s best to enjoy these fresh!
FAQ
Conclusion
There you have it, folks – your new favorite way to make grilled cheese! These Hawaiian Roll Grilled Cheese Sliders are more than just a recipe; they’re a ticket to easy, cheesy, utterly comforting bliss. Whether you’re feeding a crowd, a hungry family, or just your own comfort food craving, these sliders deliver every single time. So go ahead, whip up a batch, and prepare to fall in love. Don’t forget to Pin this recipe for later so you can revisit this deliciousness whenever the craving strikes!

Hawaiian Roll Grilled Cheese Sliders: Easy Family Favorite
Ingredients
- 12 Hawaiian sweet rolls
- 1/2 cup unsalted butter, melted
- 1 tbsp Dijon mustard (optional)
- 1 tsp garlic powder
- 1/2 tsp onion powder
- 8 slices provolone cheese
- 8 slices cheddar cheese
- 8 slices mozzarella cheese (or preferred blend)
- Flaky sea salt and fresh parsley for garnish (optional)
Instructions
- Step 1 1. Preheat oven to 350°F (175°C). Lightly grease a 9x13 inch baking dish.
- Step 2 2. Slice the entire block of Hawaiian rolls horizontally, keeping them connected. Place the bottom half in the prepared baking dish.
- Step 3 3. In a small bowl, whisk together melted butter, Dijon mustard (if using), garlic powder, and onion powder. Brush half of this mixture generously over the bottom half of the rolls.
- Step 4 4. Layer the provolone, cheddar, and mozzarella cheeses evenly over the bottom rolls.
- Step 5 5. Place the top half of the rolls over the cheese layers. Brush the remaining butter mixture over the tops of the rolls.
- Step 6 6. Cover the baking dish tightly with aluminum foil.
- Step 7 7. Bake for 15 minutes, then remove the foil and bake for another 10-15 minutes, or until the tops are golden brown and the cheese is bubbly and melted.
- Step 8 8. Let rest for 5 minutes before slicing into individual sliders and serving warm. Garnish with flaky sea salt and fresh parsley, if desired.