Best Ever How to Make Pickled Carrots – 4 Quick & Easy Canning Recipes!
There’s something truly magical about turning humble garden vegetables into something spectacular, isn’t there? I remember my first foray into pickling, many years ago, on a particularly blustery autumn afternoon. My grandmother, a true kitchen wizard, had just handed me a basket overflowing with freshly dug carrots from her garden, their earthy scent still clinging to the vibrant orange roots. “These, my dear,” she’d said with a twinkle in her eye, “are destined for greatness!” That day, we spent hours in her cozy kitchen, the air filled with the comforting aroma of vinegar and spices, transforming those carrots into crunchy, tangy treasures. It was more than just a recipe; it was a lesson in preserving flavor and creating lasting memories.
Now, I’m thrilled to share with you my tried-and-true, family-favorite method for How to Make Pickled Carrots – 4 Quick & Easy Canning Recipes! This isn’t just any pickling guide; it’s a tested collection of recipes designed to make your journey into homemade pickles utterly delicious and wonderfully simple. These vibrant, crunchy pickled carrots are incredibly versatile, perfect for adding a bright pop of flavor to any meal, enhancing your charcuterie board, or simply enjoying as a healthy, tangy snack. They bring a burst of freshness and a delightful crunch that can elevate everything from a weeknight salad to a festive holiday spread, proving that even simple ingredients can create truly exceptional results.
Whether you’re new to canning or a seasoned pro, these easy recipes will guide you through creating perfect pickled carrots every single time. Get ready to fall in love with these tangy delights that are packed with flavor and so satisfying to make. They are truly a game-changer for meal prep and a fantastic way to enjoy vegetables year-round, adding a delightful zest and crunch to your culinary repertoire. Let’s get pickling!
Why You’ll Love This Recipe
❤️ Oh, my goodness, where do I even begin? These pickled carrots are an absolute revelation, transforming humble root vegetables into a vibrant, crunchy, and utterly irresistible culinary delight. You’ll find yourself reaching for them again and again, and here’s why this recipe will quickly become a cherished favorite in your kitchen!
- Incredibly Versatile: From charcuterie boards and sandwich toppers to salad additions and healthy snacks, these pickled carrots fit seamlessly into so many culinary roles. They truly brighten up any dish with their tangy zest!
- Crisp & Crunchy Perfection: We’ve nailed the perfect balance, ensuring each bite offers a satisfying crunch that makes them addictive. No soggy pickles here – just delightful texture!
- Bursting with Flavor: Each of the four recipes offers a unique flavor profile, from classic dill and garlic to spicy sriracha and vibrant turmeric. You’ll discover your new favorite way to enjoy carrots!
- So Easy to Make: Don’t be intimidated by canning! Our step-by-step guide makes the process straightforward and enjoyable, even for beginners. You’ll feel like a kitchen superstar.
- Beautiful & Appetizing: The vibrant orange of the carrots, often enhanced with colorful spices, looks absolutely stunning in jars. They make fantastic edible gifts or a gorgeous addition to your pantry shelves.
- Healthy & Wholesome: Carrots are packed with vitamins and fiber, and pickling is a wonderful way to preserve their goodness without losing their nutritional value. Enjoy a guilt-free, flavorful treat!
- Customizable to Your Taste: Love a bit more heat? Crave extra garlic? This recipe is a fantastic starting point for experimentation. Feel free to adjust the spices to perfectly match your palate.
- Long Shelf Life: Once properly canned, these pickled carrots can last for months in your pantry, allowing you to enjoy the taste of fresh, tangy carrots well beyond harvest season. It’s truly a gift that keeps on giving!
- Economical & Sustainable: Making your own pickles is often more cost-effective than buying them, and it’s a wonderful way to use up an abundance of carrots, reducing food waste and making the most of your produce.
- A Sense of Accomplishment: There’s immense satisfaction in seeing those beautiful jars lined up, knowing you made them yourself. It’s a truly rewarding culinary experience!
What You Need
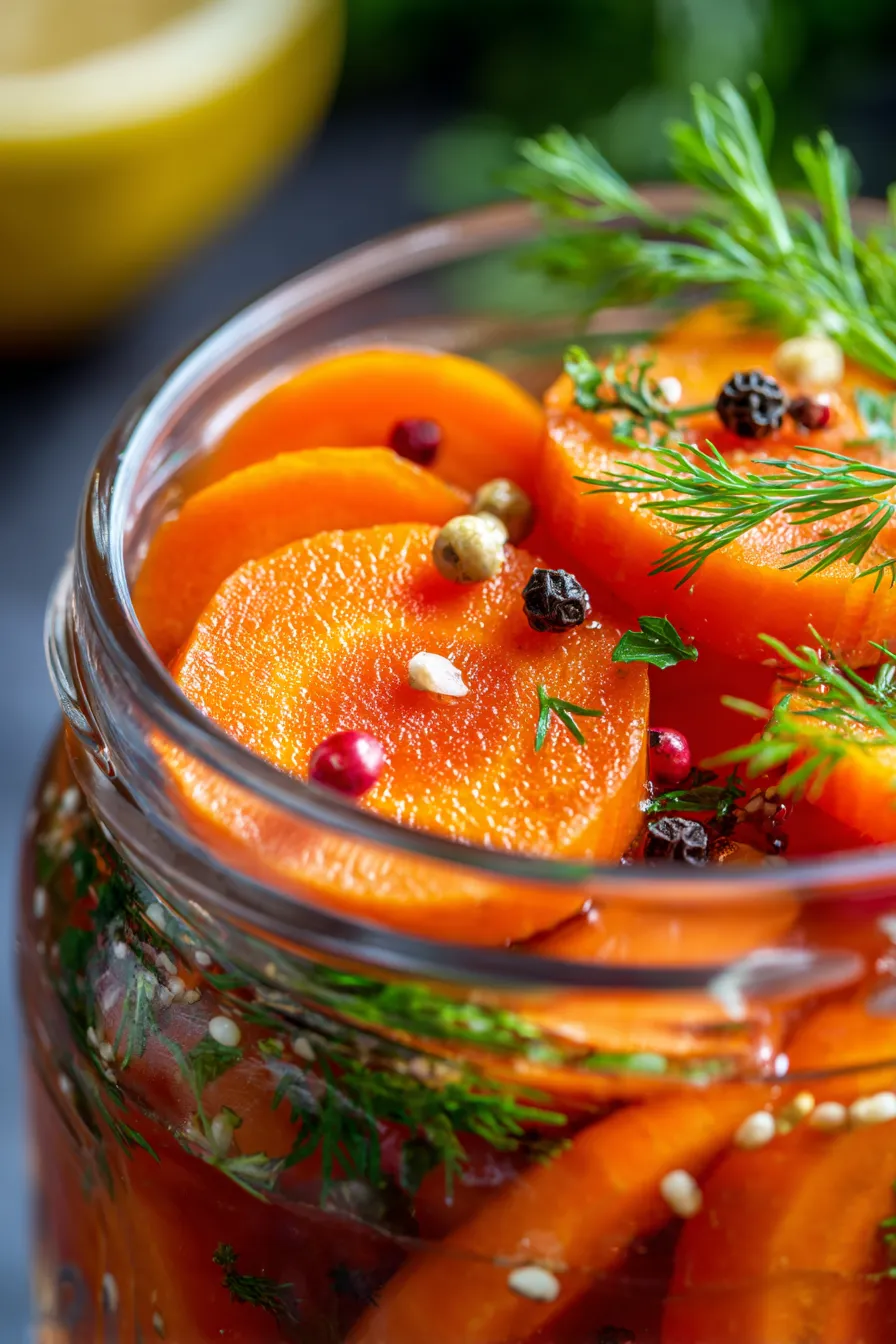
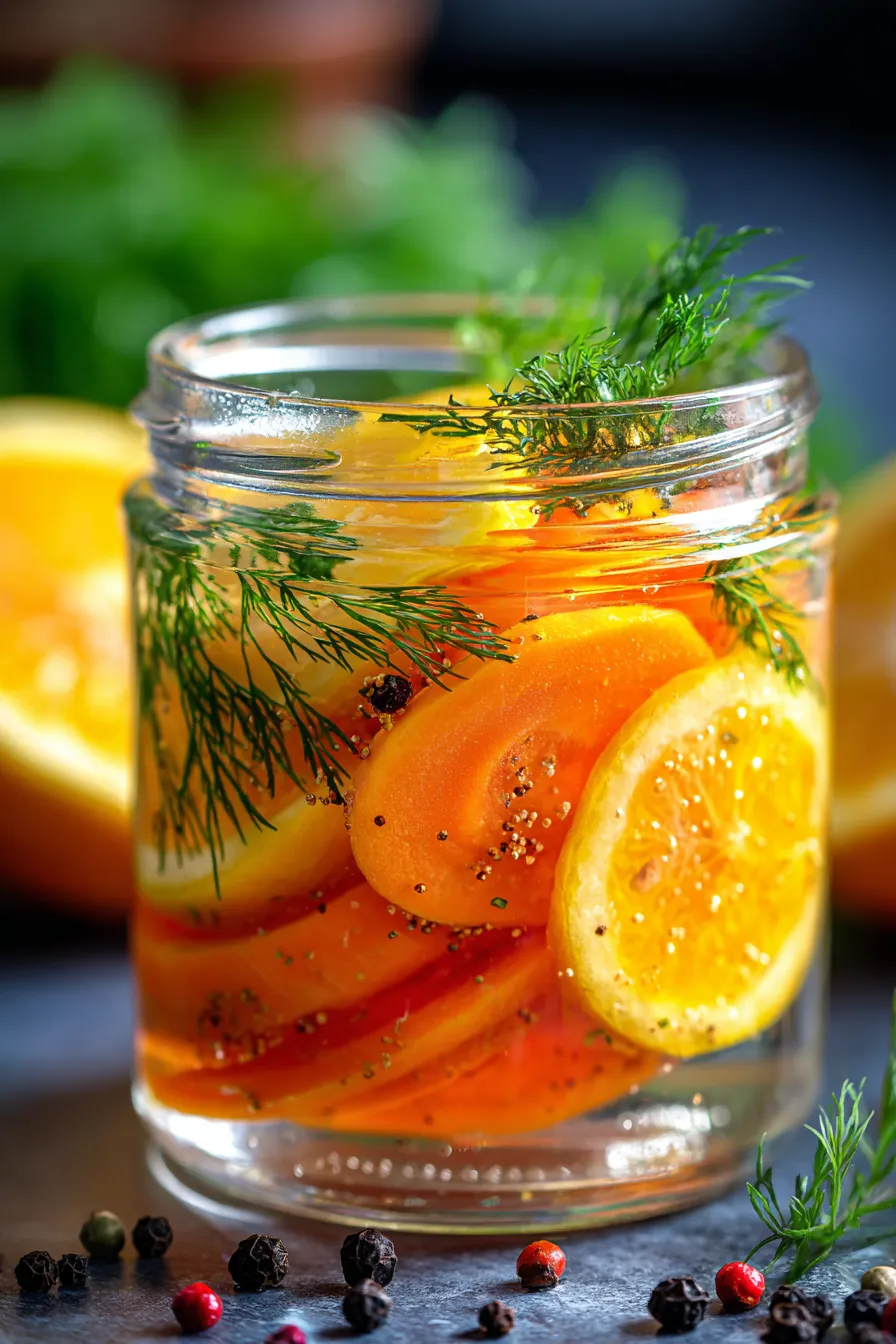
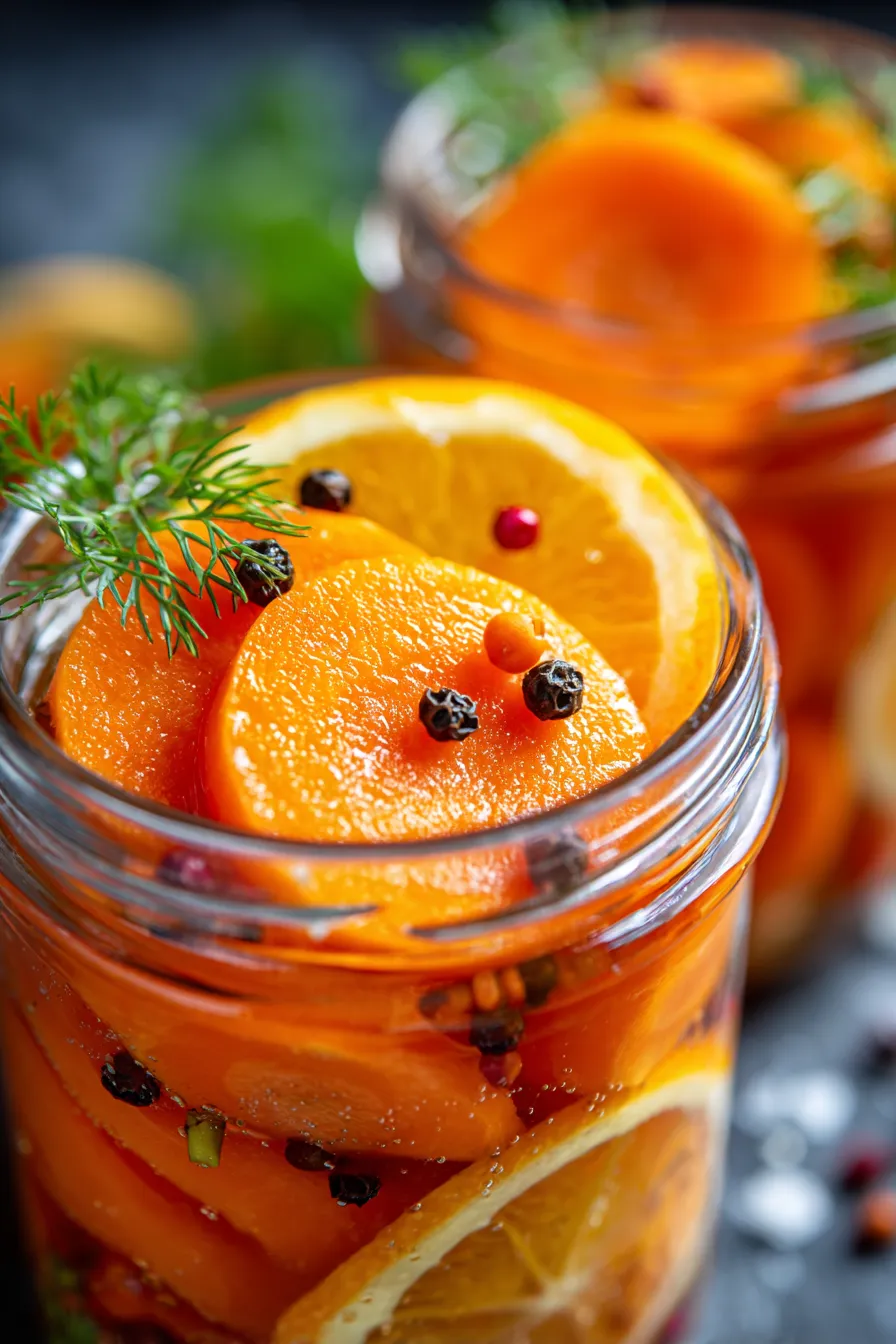
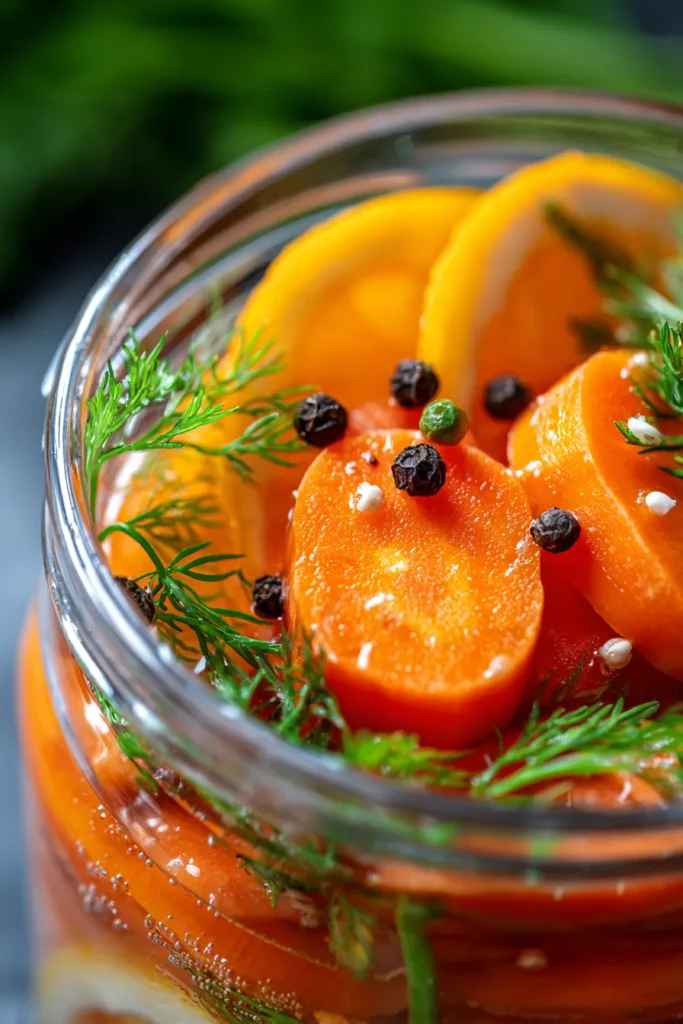
You only need a few simple pantry staples for this recipe, alongside your beautiful fresh carrots! The beauty of pickling lies in its simplicity, relying on common ingredients to create extraordinary flavor. You’ll likely have most of these on hand already, making this an accessible project for any home cook. Check the full printable recipe card below for detailed measurements and specific ingredient notes for each of the four delicious variations. We’re talking fresh, crisp carrots, quality vinegars, water, sugar, salt, and an exciting array of spices to bring each recipe to life!
Expert Tips
💡 Achieving perfectly pickled carrots is an art, but with these expert tips, you’ll master it in no time! These little secrets will elevate your pickling game and ensure your jars are filled with nothing but perfection.
- Choose the Freshest Carrots: The foundation of great pickled carrots is, well, great carrots! Select firm, crisp carrots free from blemishes. Younger, smaller carrots tend to be sweeter and more tender, but any size works if sliced appropriately.
- Uniform Slices are Key: Whether you opt for coin shapes, sticks, or crinkle-cut, try to keep your carrot pieces roughly the same size. This ensures even cooking and consistent crunch in every single bite. A mandoline can be a fantastic tool for this!
- Proper Jar Sterilization: This is CRUCIAL for safe canning and long-term storage. Wash jars and lids in hot, soapy water, then sterilize by boiling them or running them through a dishwasher’s sanitizing cycle. Keep them hot until filling.
- Don’t Overpack the Jars: While you want to fill your jars efficiently, avoid jamming the carrots in too tightly. Leave enough space for the pickling brine to circulate and fully submerge all the vegetables.
- Hot Brine, Hot Jars: Pouring hot brine into hot jars helps prevent thermal shock, which can cause jars to crack. It also aids in creating a strong vacuum seal during canning.
- Leave Headspace: Always leave about 1/2 inch of headspace (the space between the top of the brine and the rim of the jar). This is essential for proper sealing and to prevent jars from bursting during processing.
- Remove Air Bubbles: After filling with brine, use a non-metallic utensil (like a chopstick or plastic knife) to gently work around the inside of the jar. This releases any trapped air bubbles, ensuring better contact between the carrots and the brine.
- Wipe Rims Clean: Before placing lids, meticulously wipe the rims of your jars with a clean, damp cloth. Any food debris on the rim can prevent a proper seal.
- Finger-Tight Lids: Screw on the bands just until finger-tight. This allows air to escape during processing, which is necessary for a good vacuum seal. Over-tightening can prevent sealing.
- Water Bath Canning Basics: Ensure your water bath canner is at a rolling boil before lowering the jars. The water level should cover the jars by at least an inch. Process for the recommended time, adjusting for altitude if necessary.
- Cool Slowly & Check Seals: After processing, carefully remove jars and let them cool undisturbed on a towel-lined counter for 12-24 hours. You’ll hear satisfying ‘pings’ as they seal. Check for seals by pressing the center of the lid – it should not flex.
- Patience is a Virtue: While they are edible right away, pickled carrots taste best after sitting for at least 1-2 weeks. This allows the flavors to fully meld and the carrots to properly absorb the tangy brine. Trust me, the wait is worth it!
- Experiment with Spices: Don’t be afraid to adjust the spice blends to your liking. Add more garlic, a pinch of red pepper flakes for heat, or different herbs like thyme or oregano. Make these recipes truly your own!
Variations & Substitutions
One of the joys of pickling is how incredibly adaptable it is! These 4 quick and easy canning recipes for pickled carrots are just the beginning. Feel free to unleash your inner culinary artist and customize them to your heart’s content. Here are some fantastic ideas to get you started:
- Spicy Sriracha Pickles: For a fiery kick, simply add extra red pepper flakes or a tablespoon or two of sriracha sauce directly to the brine. This gives them a vibrant heat that’s perfect for spice lovers.
- Garlic & Dill Classics: Stick to the tried-and-true! Load up on fresh dill sprigs and several peeled garlic cloves per jar for that quintessential dill pickle flavor. You can even add a teaspoon of dill seeds for more intense aroma.
- Turmeric & Ginger Zing: For an earthy, vibrant, and incredibly healthy twist, add 1/2 teaspoon of ground turmeric and a few thin slices of fresh ginger to each jar. This creates a beautiful golden hue and a wonderful, warm flavor profile.
- Sweet & Sour Delight: Increase the sugar slightly in your brine (perhaps by an extra tablespoon per batch) and add a few whole star anise pods for a subtle, aromatic licorice note. This variation is fantastic with Asian-inspired dishes.
- Herbaceous Twist: Experiment with different fresh herbs! A sprig of rosemary, thyme, or even a bay leaf can add intriguing complexity to your pickled carrots.
- Vegetable Medley: Don’t limit yourself to just carrots! Add other firm vegetables to your pickling jars, such as sliced cucumbers, green beans, cauliflower florets, or pearl onions. Ensure they are cut to similar sizes for even pickling.
- Apple Cider Vinegar Swap: While white vinegar is common, you can use apple cider vinegar for a slightly fruitier, milder tang. Just ensure it’s at least 5% acidity for canning safety.
- Sugar Substitutions: For those managing sugar intake, you can experiment with sugar substitutes, keeping in mind they might affect the overall flavor balance. Always ensure proper salt-to-liquid ratios are maintained for safety.
- Keto-Friendly Option: Omit the sugar entirely or use a keto-friendly sweetener. The pickling process itself is naturally low-carb.
Storage & Freezing
One of the best things about making pickled carrots is their impressive shelf life, thanks to the magic of canning! Proper storage ensures you can enjoy your delicious homemade treats for months to come.
- Pantry Storage (Sealed Jars): Once your jars are properly processed in a water bath canner and have sealed, they can be stored in a cool, dark place like a pantry or cupboard for up to 1 year. Always double-check that the seals are intact before storing. If a jar doesn’t seal, move it to the refrigerator immediately.
- Refrigerator Storage (Opened Jars): Once a jar of pickled carrots is opened, it must be stored in the refrigerator. They will remain fresh and crunchy for about 3-4 weeks. Always use a clean utensil when removing carrots from the jar to prevent contamination.
- Refrigerator Storage (Unsealed Jars): If, for any reason, a jar doesn’t seal after processing, don’t despair! Simply store it in the refrigerator. It will be good to eat for up to 3-4 weeks. Think of these as your first batch to enjoy!
- Freezing: Pickled carrots are generally NOT recommended for freezing. The freezing and thawing process can significantly alter their texture, turning them mushy and losing that delightful crunch that makes them so appealing. The pickling brine helps preserve them without the need for freezing.
FAQ
Q: Do I need special canning equipment to make pickled carrots?
A: For shelf-stable pickled carrots, you will need a water bath canner (or a very large pot with a rack that can accommodate your jars and cover them with water), canning jars with new lids and bands, a jar lifter, and a funnel. However, if you plan to store them only in the refrigerator, you just need clean jars and lids.
Q: How long do pickled carrots last?
A: Properly canned and sealed pickled carrots can last in a cool, dark pantry for up to one year. Once opened, or if stored in the refrigerator from the start, they will typically remain fresh and delicious for about 3-4 weeks.
Q: Why are my pickled carrots not crunchy?
A: Several factors can lead to soft pickles. Using older, less crisp carrots, overcooking them before pickling (if blanching), or an incorrect brine ratio (too low in acid) can all contribute. Ensure your carrots are fresh, avoid over-processing in the water bath, and stick to the recommended brine ratios for best results.
Q: Can I use different types of vinegar?
A: Yes, you can! White vinegar is most common for its clear color and sharp tang. Apple cider vinegar offers a slightly milder, fruitier flavor but ensure it has at least 5% acidity for safe canning. Avoid vinegars with lower acidity levels or specialty vinegars like balsamic, as they may not be suitable for pickling.
There you have it, fellow food lovers! Four fantastic ways to transform simple carrots into pickled perfection. There’s truly nothing quite like the satisfaction of opening a jar of your own homemade, vibrant pickled carrots, knowing the love and care that went into making them. From a quick weeknight garnish to a show-stopping addition to your next gathering, these recipes are guaranteed to become staples in your kitchen. So grab those carrots, fire up your canning pots, and get ready to enjoy the tangy, crunchy goodness!
Don’t forget to pin this recipe for later so you can always find your way back to these amazing pickled carrots. Happy pickling!
Pickled Carrots Recipe: 4 Easy Canning Ideas for Crispy Bites
Ingredients
- 2 lbs carrots, peeled and sliced
- 2 cups white vinegar (5% acidity)
- 2 cups water
- 2 tbsp pickling salt
- 2 tbsp granulated sugar
- 4-8 cloves garlic, peeled (optional)
- 4-8 sprigs fresh dill (optional)
- 1 tbsp mustard seeds (optional)
- 1 tsp red pepper flakes (optional)
- 1 tsp turmeric powder (optional)
Instructions
- Step 1 Sterilize four pint-sized canning jars and lids in boiling water or a dishwasher.
- Step 2 In each hot jar, add your desired optional spices (garlic, dill, mustard seeds, red pepper flakes, turmeric).
- Step 3 Pack the sliced carrots tightly into the hot jars, leaving 1/2 inch of headspace.
- Step 4 In a medium saucepan, combine vinegar, water, pickling salt, and sugar. Bring to a rolling boil, stirring until salt and sugar are dissolved.
- Step 5 Carefully pour the hot brine over the carrots in each jar, ensuring carrots are fully submerged and maintaining 1/2 inch of headspace.
- Step 6 Tap jars gently to release air bubbles. If needed, top off with more brine.
- Step 7 Wipe jar rims clean with a damp cloth, center lids, and apply bands finger-tight.
- Step 8 Process jars in a boiling water canner for 10 minutes (adjust for altitude).
- Step 9 Remove jars and let cool undisturbed on a towel for 12-24 hours. Check seals.
- Step 10 Store sealed jars in a cool, dark place. For best flavor, wait at least 1-2 weeks before opening. Refrigerate after opening.